Chinese cured pork belly, or là ròu (腊肉) in Mandarin and lap yuk in Cantonese, is a staple in Chinese cuisine. Late autumn and winter is a great time to make this at home.
I just whipped up two batches, and I couldn’t believe how good it was! The first batch was quickly divided up and given out as gifts, and I had to promptly make another batch for ourselves.
(There is no better gift than a couple of prized pieces of this pork belly, so if you’re searching for something to give family and friends for Chinese New Year or another special occasion…look no further.)
I have to say, this is one of the best versions of this Chinese cured pork belly or maybe any Chinese cured meat that I’ve ever had.
Note: this recipe was originally published in December of 2015. We have since updated it with a brand new video showing the entire process, metric measurements, and clearer instructions. Enjoy!
A Grandma Recipe
It was originally not in the plan to do this as a recipe post for the blog, knowing that it probably wouldn’t be as popular as our Milk Bread or Pork Fried Rice.
But one night, I threw a piece of this cured pork belly into the rice cooker and cooked it together with the rice, and Sarah and Kaitlin demolished the entire thing!
We decided on the spot that we needed to document this homemade Chinese cured pork belly recipe for future generations.
For the longest time, the only person in the family that made this cured pork belly was Bill’s grandmother, who is 102 years old and still lives in Chinatown. (Meet her in our Pickled Mustard Greens post.)
Every year, when winter chases away autumn, she makes a large batch and shares it with her kids and grandkids––all four generations have been eating the lap yuk she makes for years.
Whenever we ask her for the recipe, she always talks about how easy it is. In her own words: “Just marinate the pork in some light soy sauce, ginger, some wine, and a little bit of whiskey, and hang it by the window. That’s it.”
She is right…it is pretty simple. But our instructions are thankfully a little more detailed!
Recipe Notes
- The color of the pork belly in the photos came out darker than I’d have liked. I made adjustments to the recipe accordingly by reducing the amount of dark soy sauce.
- If you don’t have baijiu (白酒), a Chinese hard liquor, whiskey is a good alternative. Choose a decent bottle, and remember to mix the hard liquor with the sauce after it cools completely.
- Make sure all the utensils, containers and your hands are squeaky clean as you prepare the pork belly for curing.
- The drying conditions should be cool and dry with air flow. The temperature should be around 50°F to 55°F (10°C to 13°C). You can cure the pork belly in a cold, dry basement (run the dehumidifier) or other cold room, in the refrigerator (just make sure the pork belly is sitting on a rack so there’s airflow around it), or even outside when it’s cold and dry. If curing outside, the temperature should be below 50°F, because you also have the sun to contend with!
- Store-bought lap yuk is usually available in longer pieces. I cut each piece in half, as each piece is a good portion for one dish.
We’ve recently added a video to this post, where I talk you through the entire recipe, so check that out right above the recipe card after looking through the step-by-step below.
Chinese Cured Pork Belly: Recipe Instructions
In a small saucepan, add the ginger, bay leaves, star anise, cinnamon sticks, Sichuan peppercorns, salt, dark soy sauce (老抽), light soy sauce (生抽), Shaoxing wine, and sugar.
Place the pot over medium heat, and bring the mixture to a simmer, stirring to dissolve the sugar. The process should only take a few minutes. Shut off the heat and allow to cool completely.

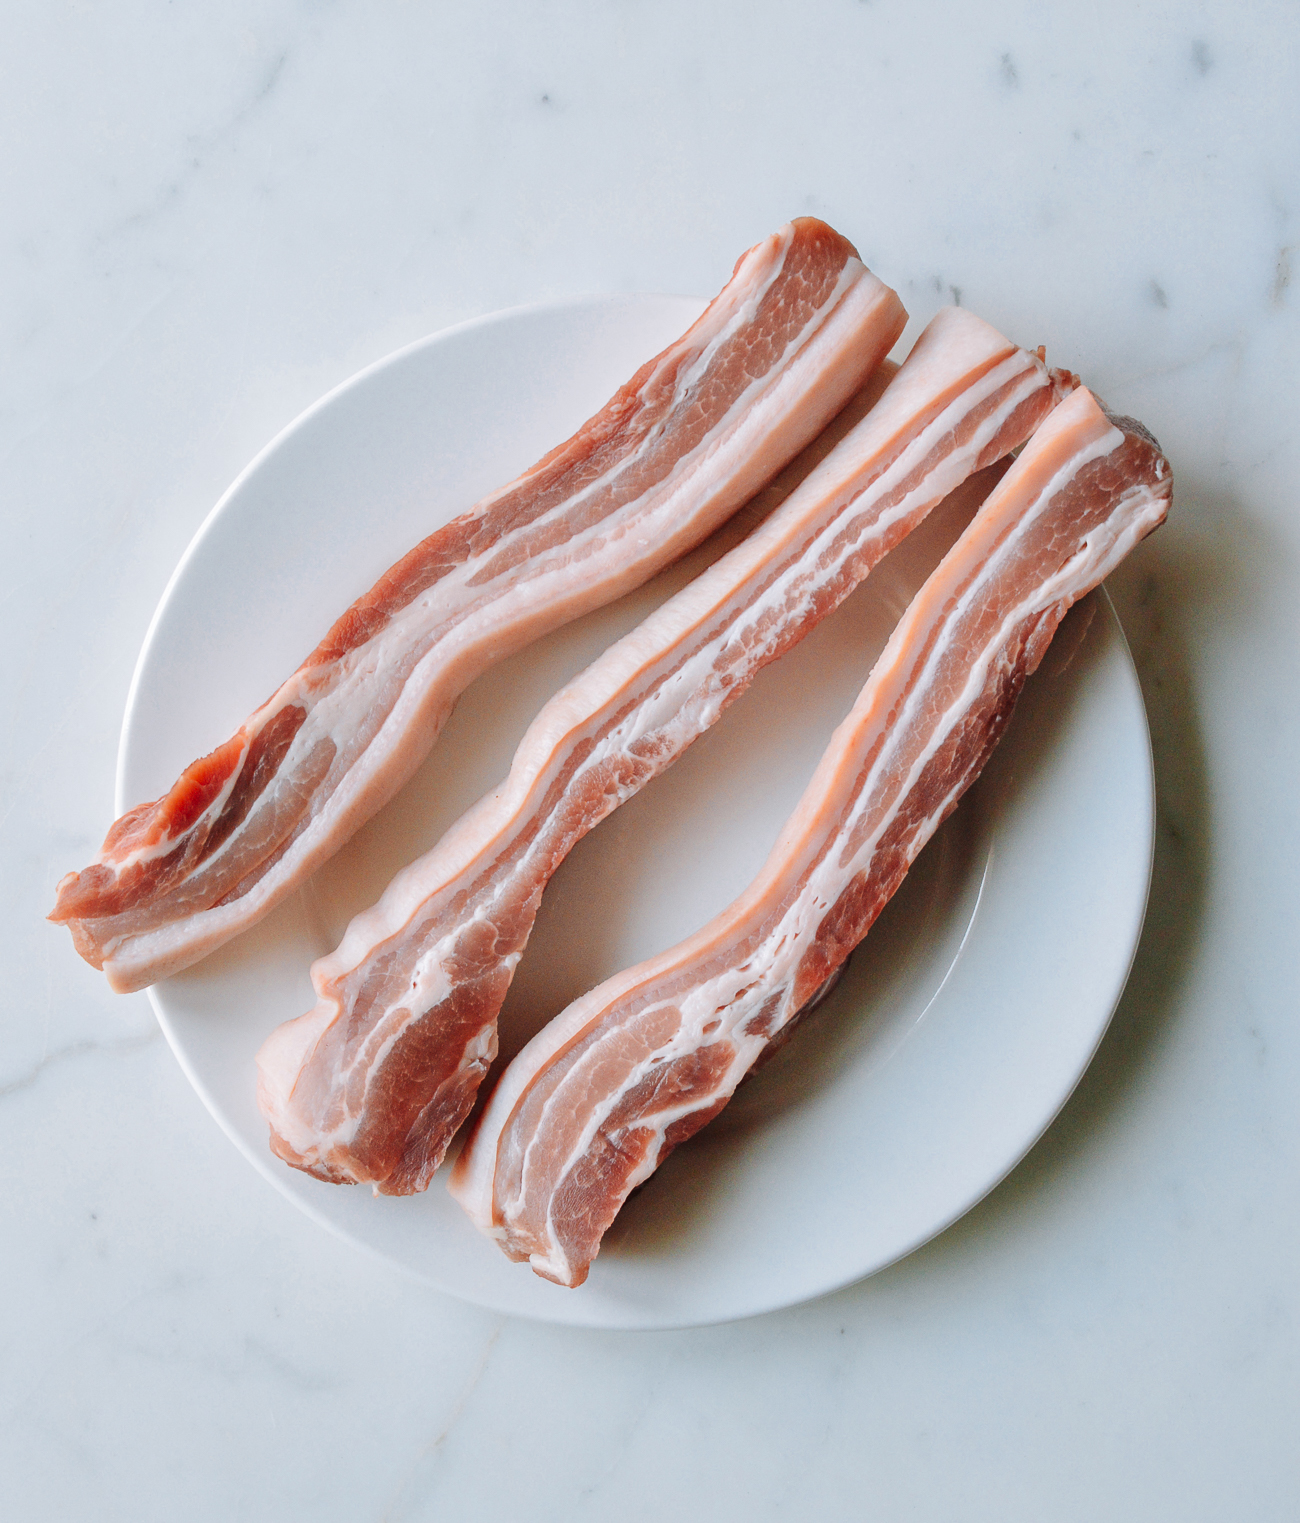
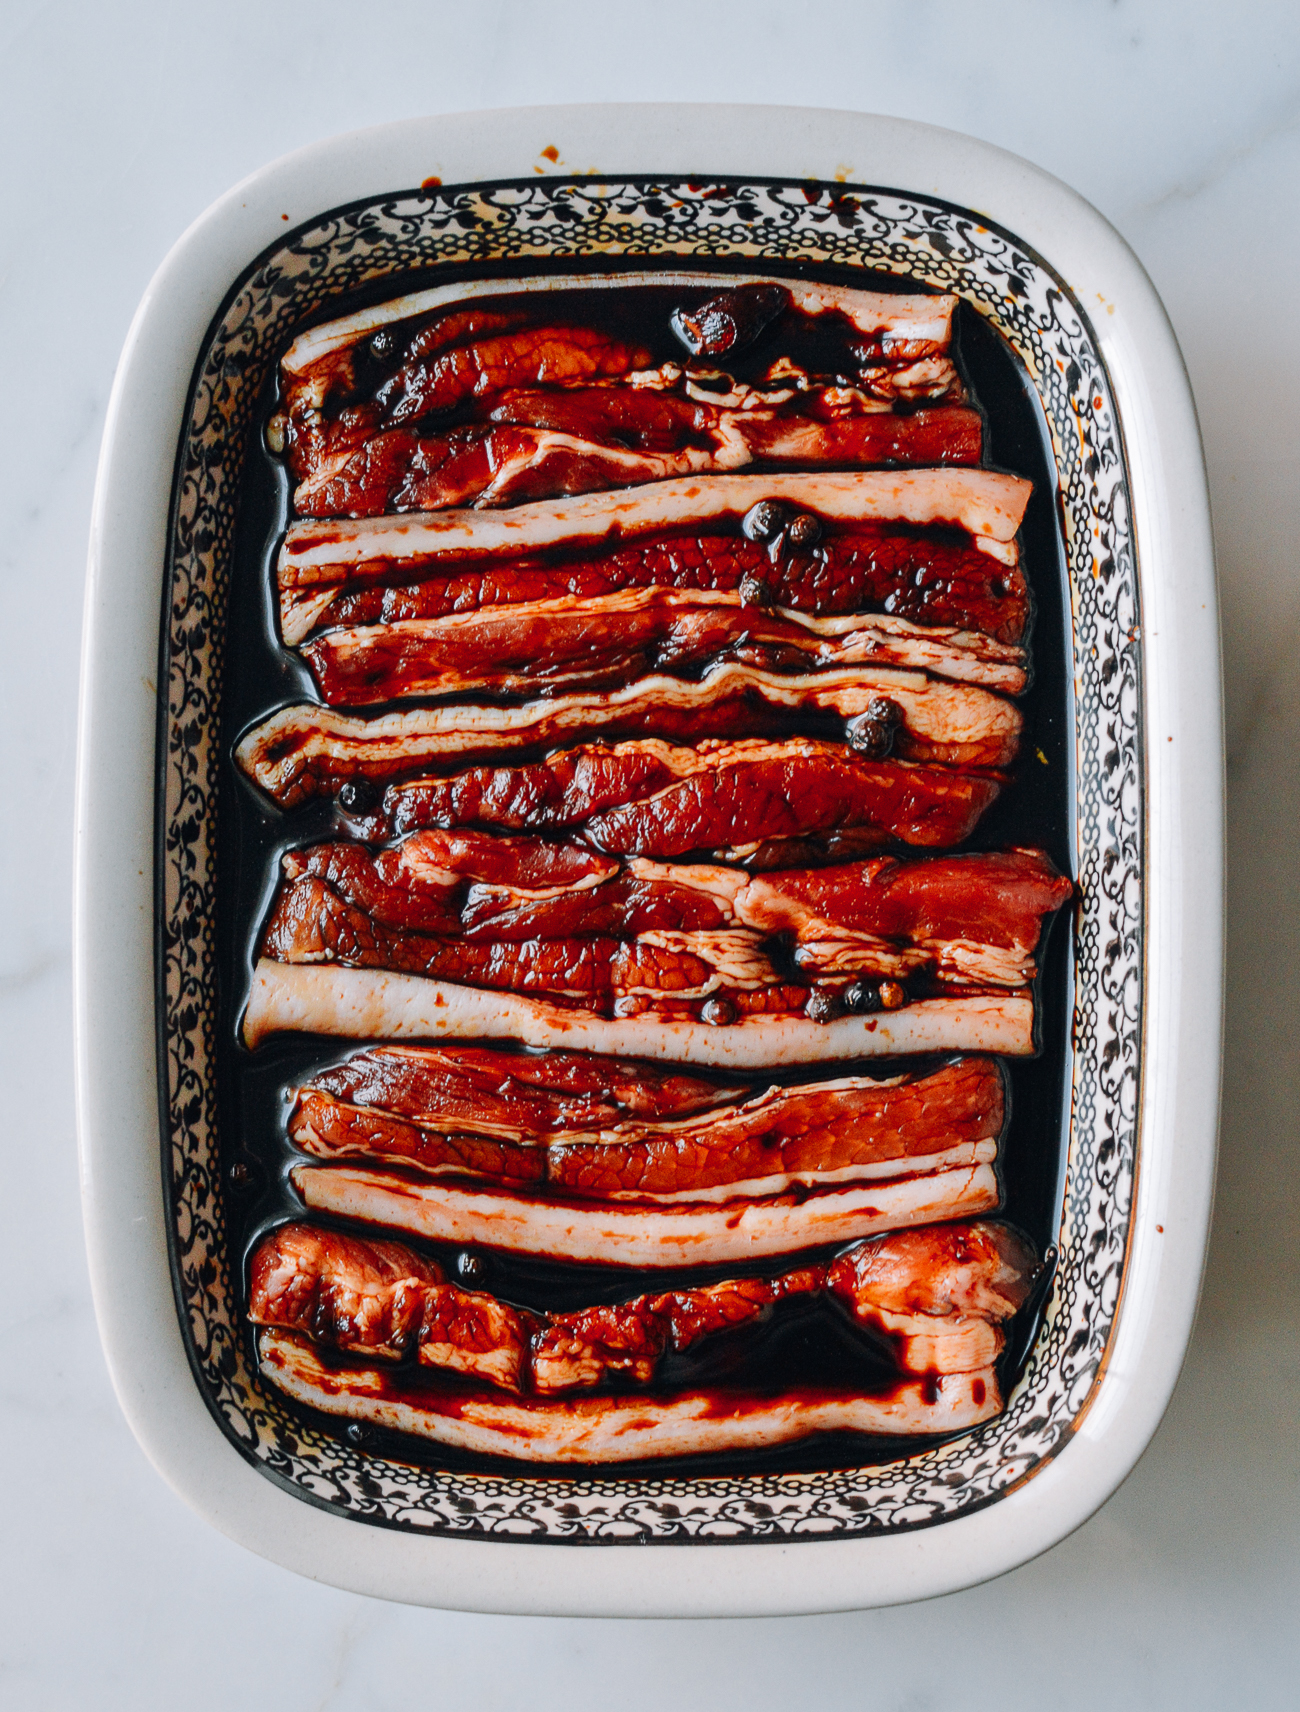
While waiting for the sauce to cool, rinse the pork belly and pat dry thoroughly with paper towels. The pork should be as dry as possible. Arrange the pieces neatly in a shallow, rimmed dish.
Once the sauce has completely cooled, stir in the baijiu (白酒 – a Chinese liquor) or whiskey.
Pour the mixture over the pork, making sure to completely submerge the meat. You can even put a clean plate or bowl on top to weigh down the meat.
Cover tightly and refrigerate for 3 full days, flipping the pork belly once each day to ensure the sauce penetrates the meat evenly.
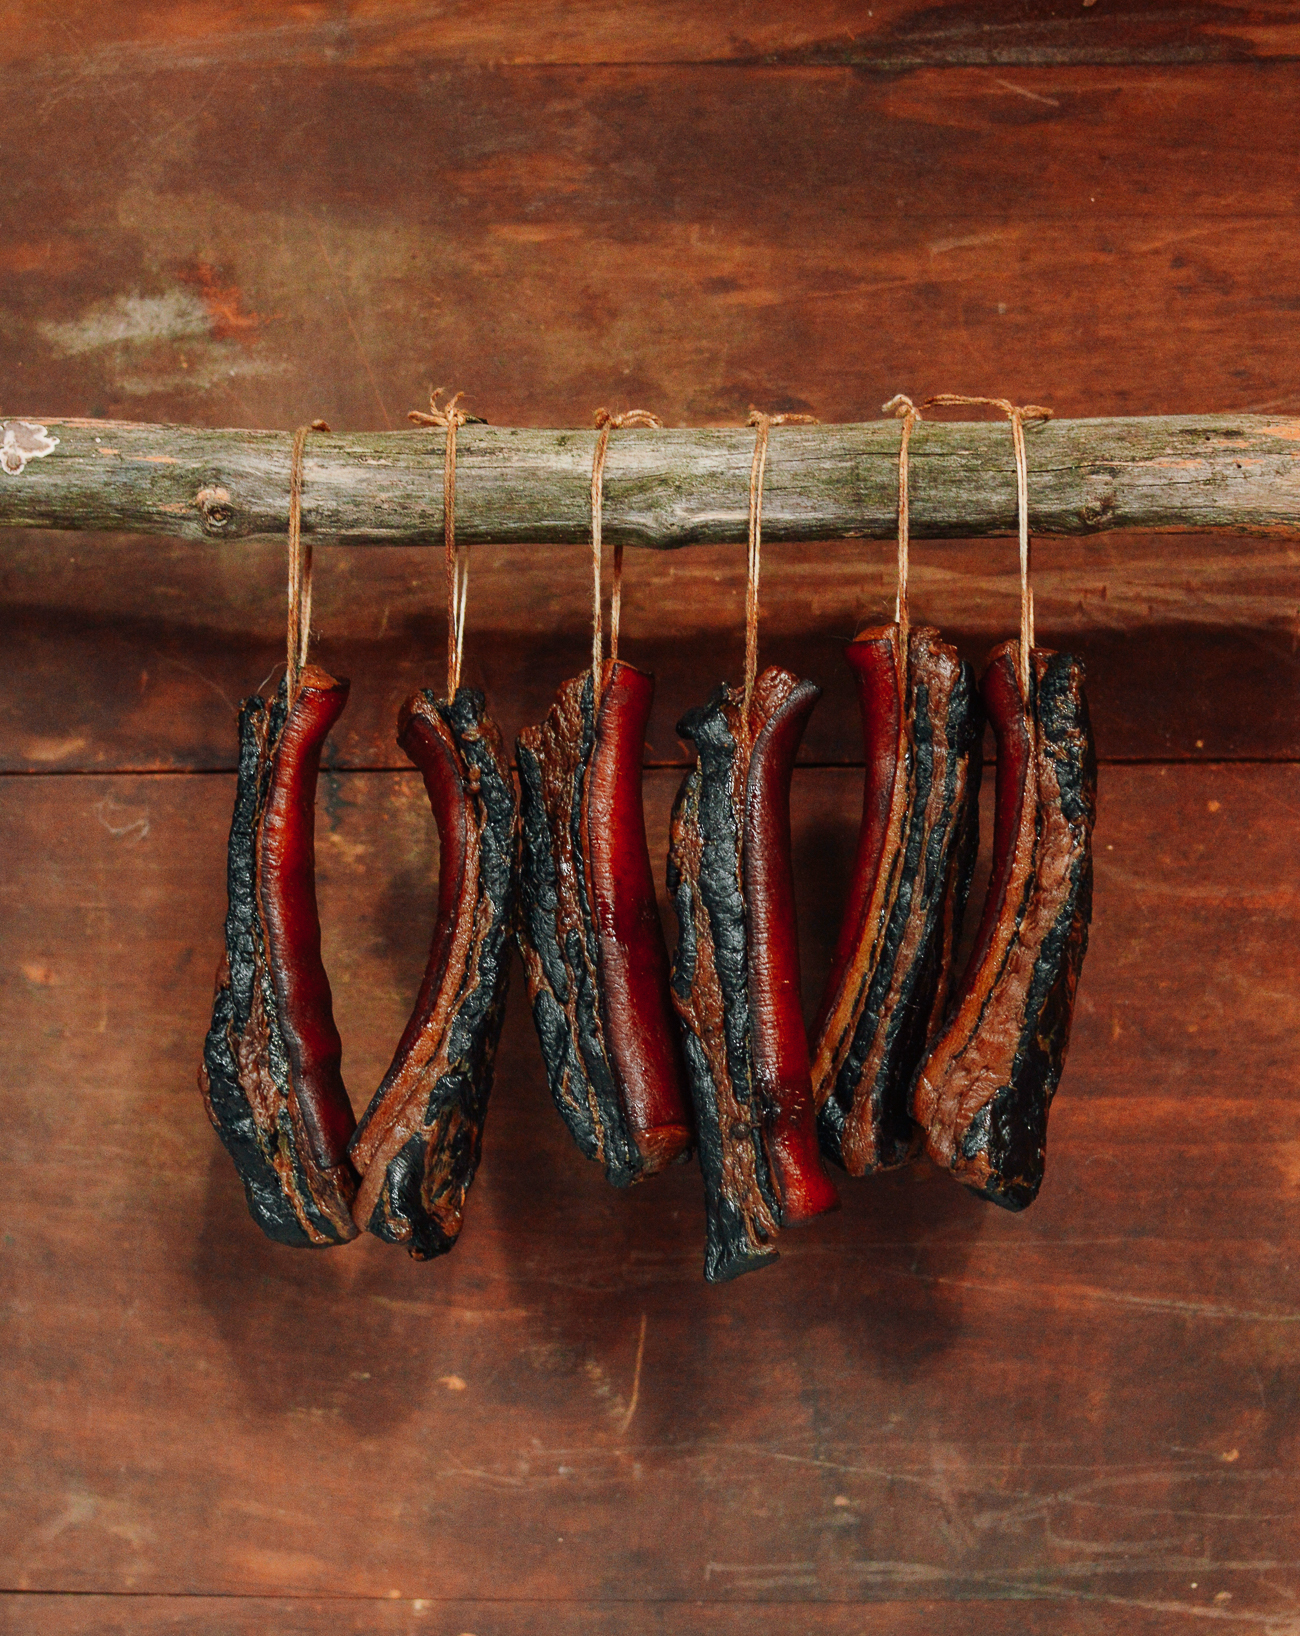
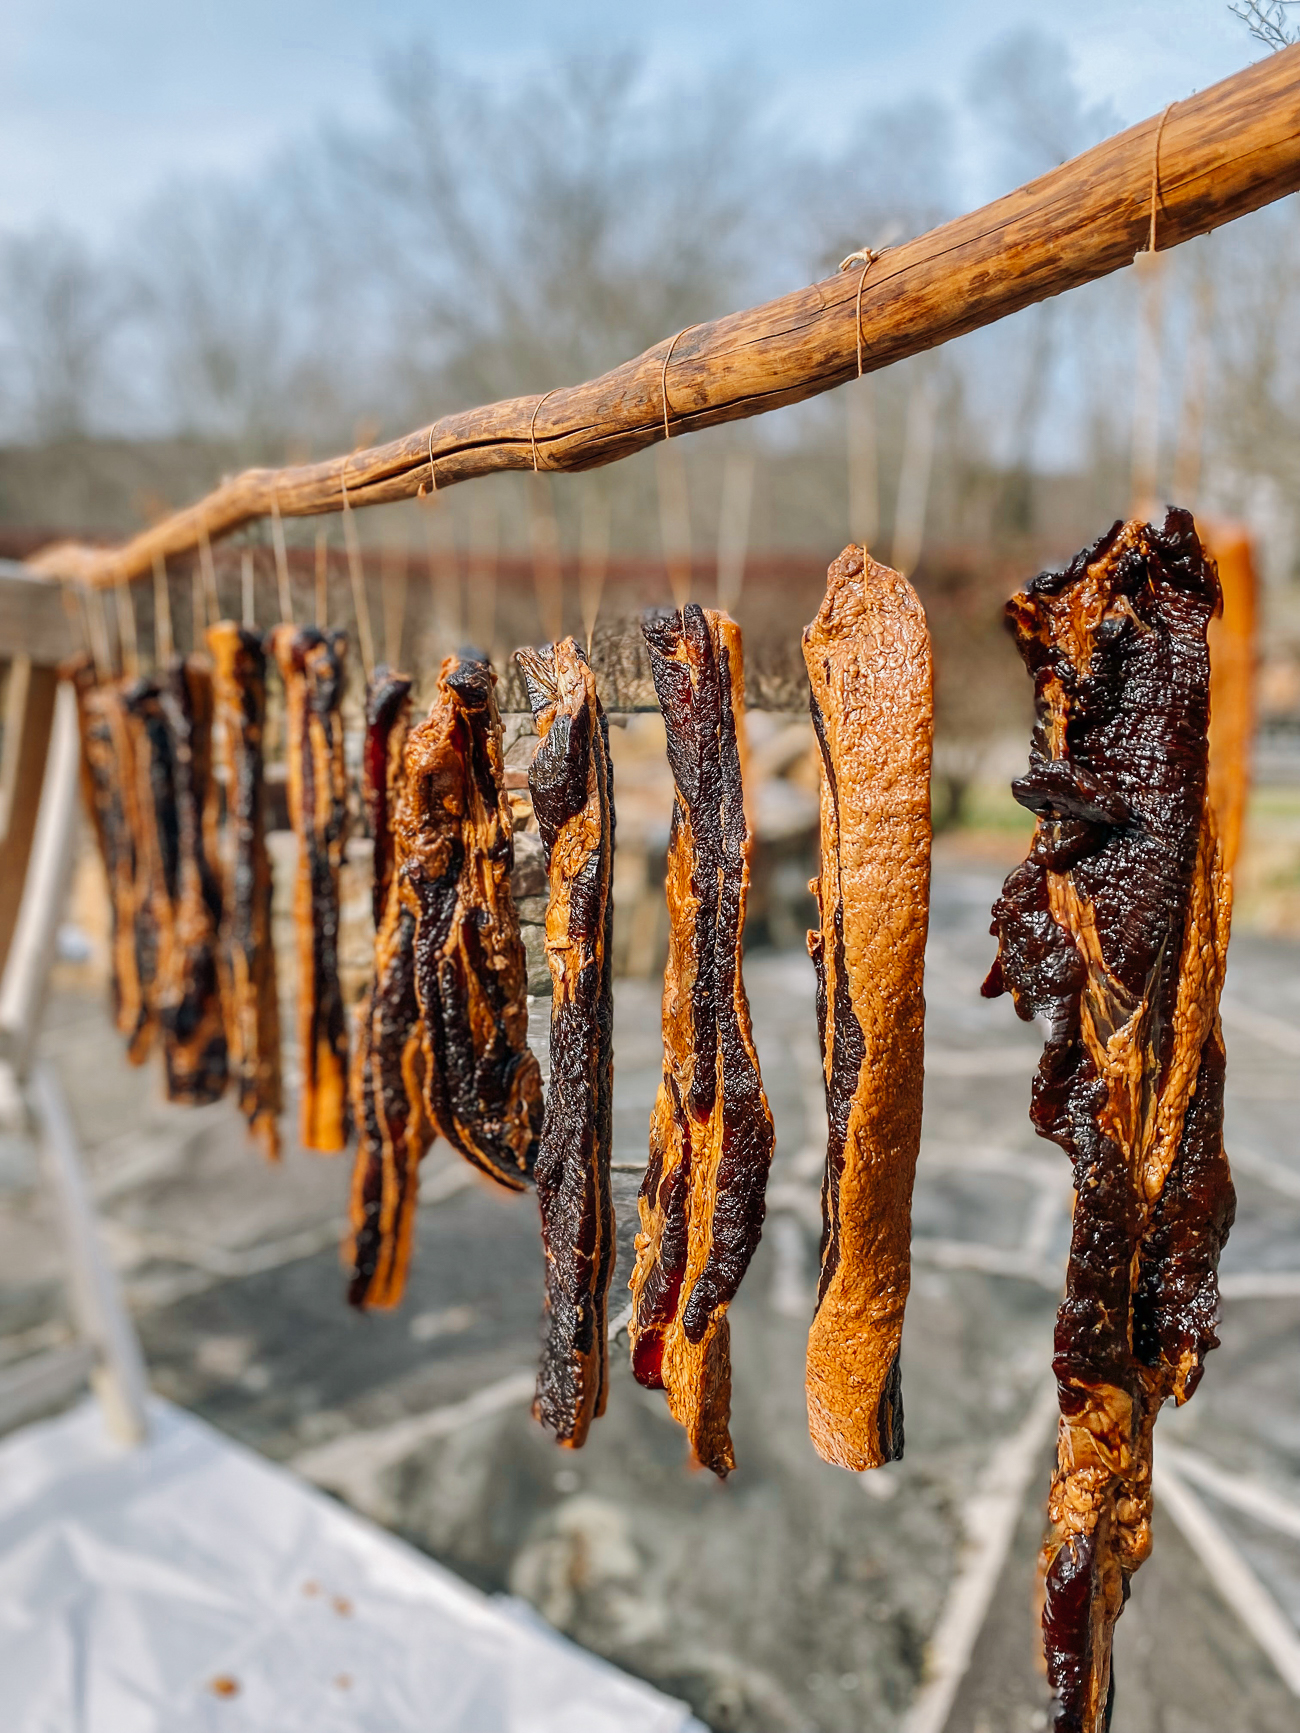
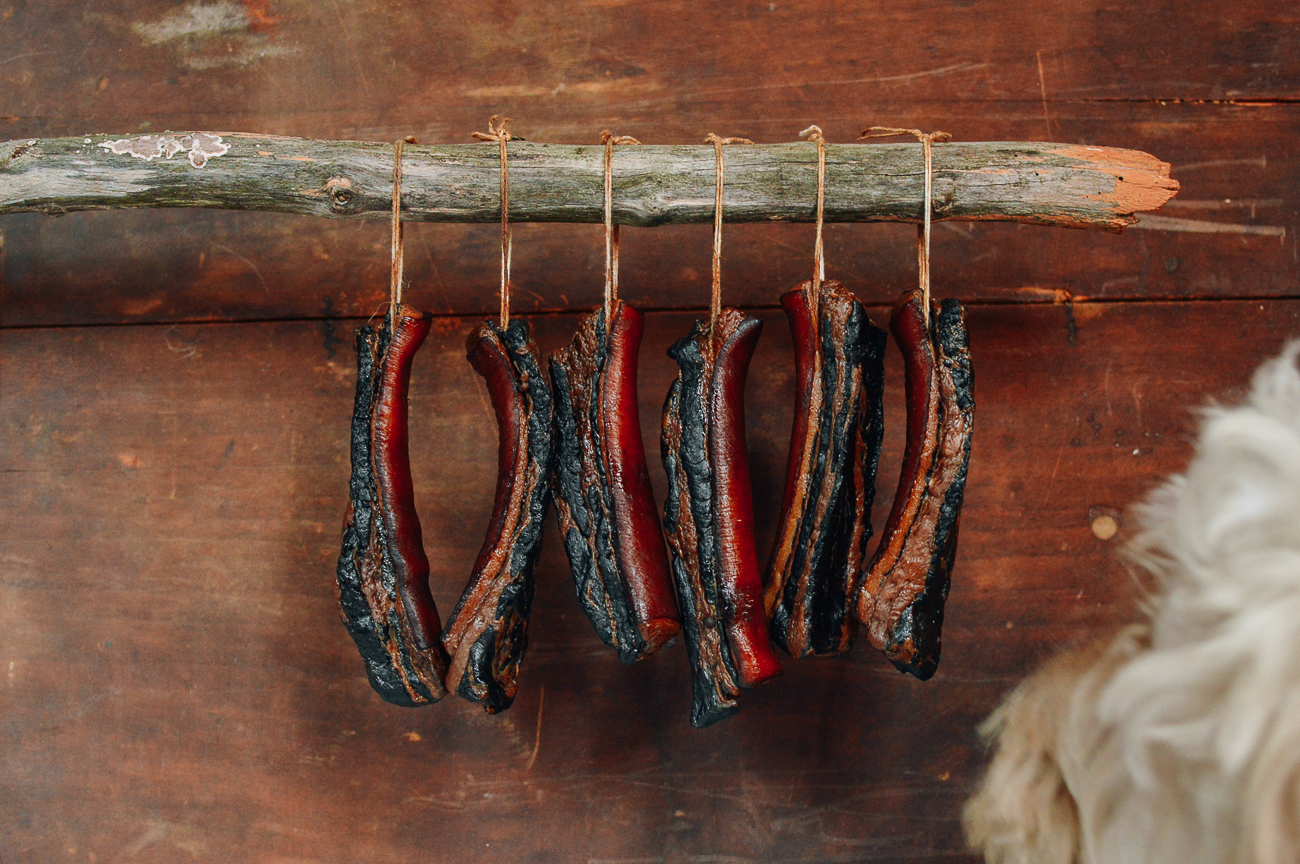
After 3 days, it’s time to hang them up to cure. Use kitchen string and a bamboo skewer to thread the string through the fat in the pork belly.
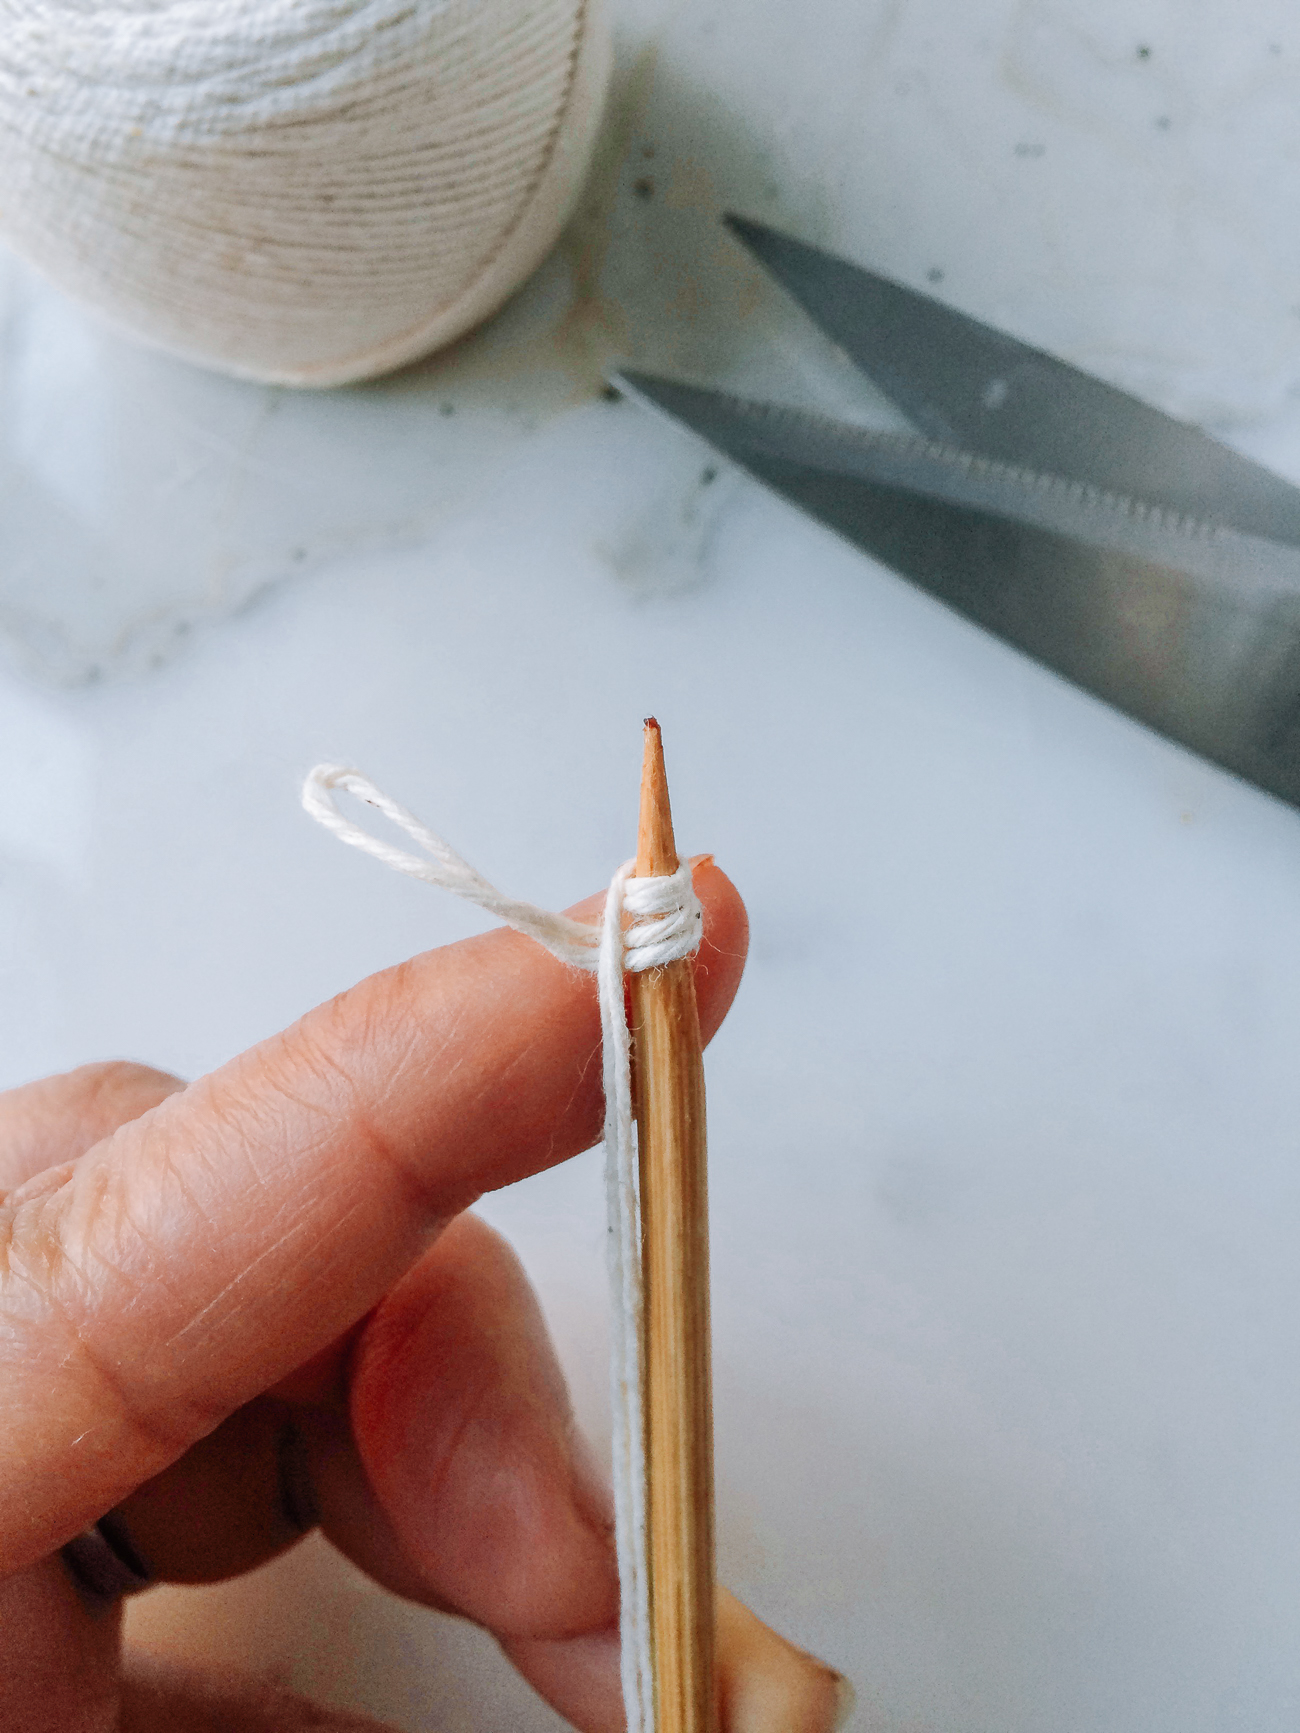
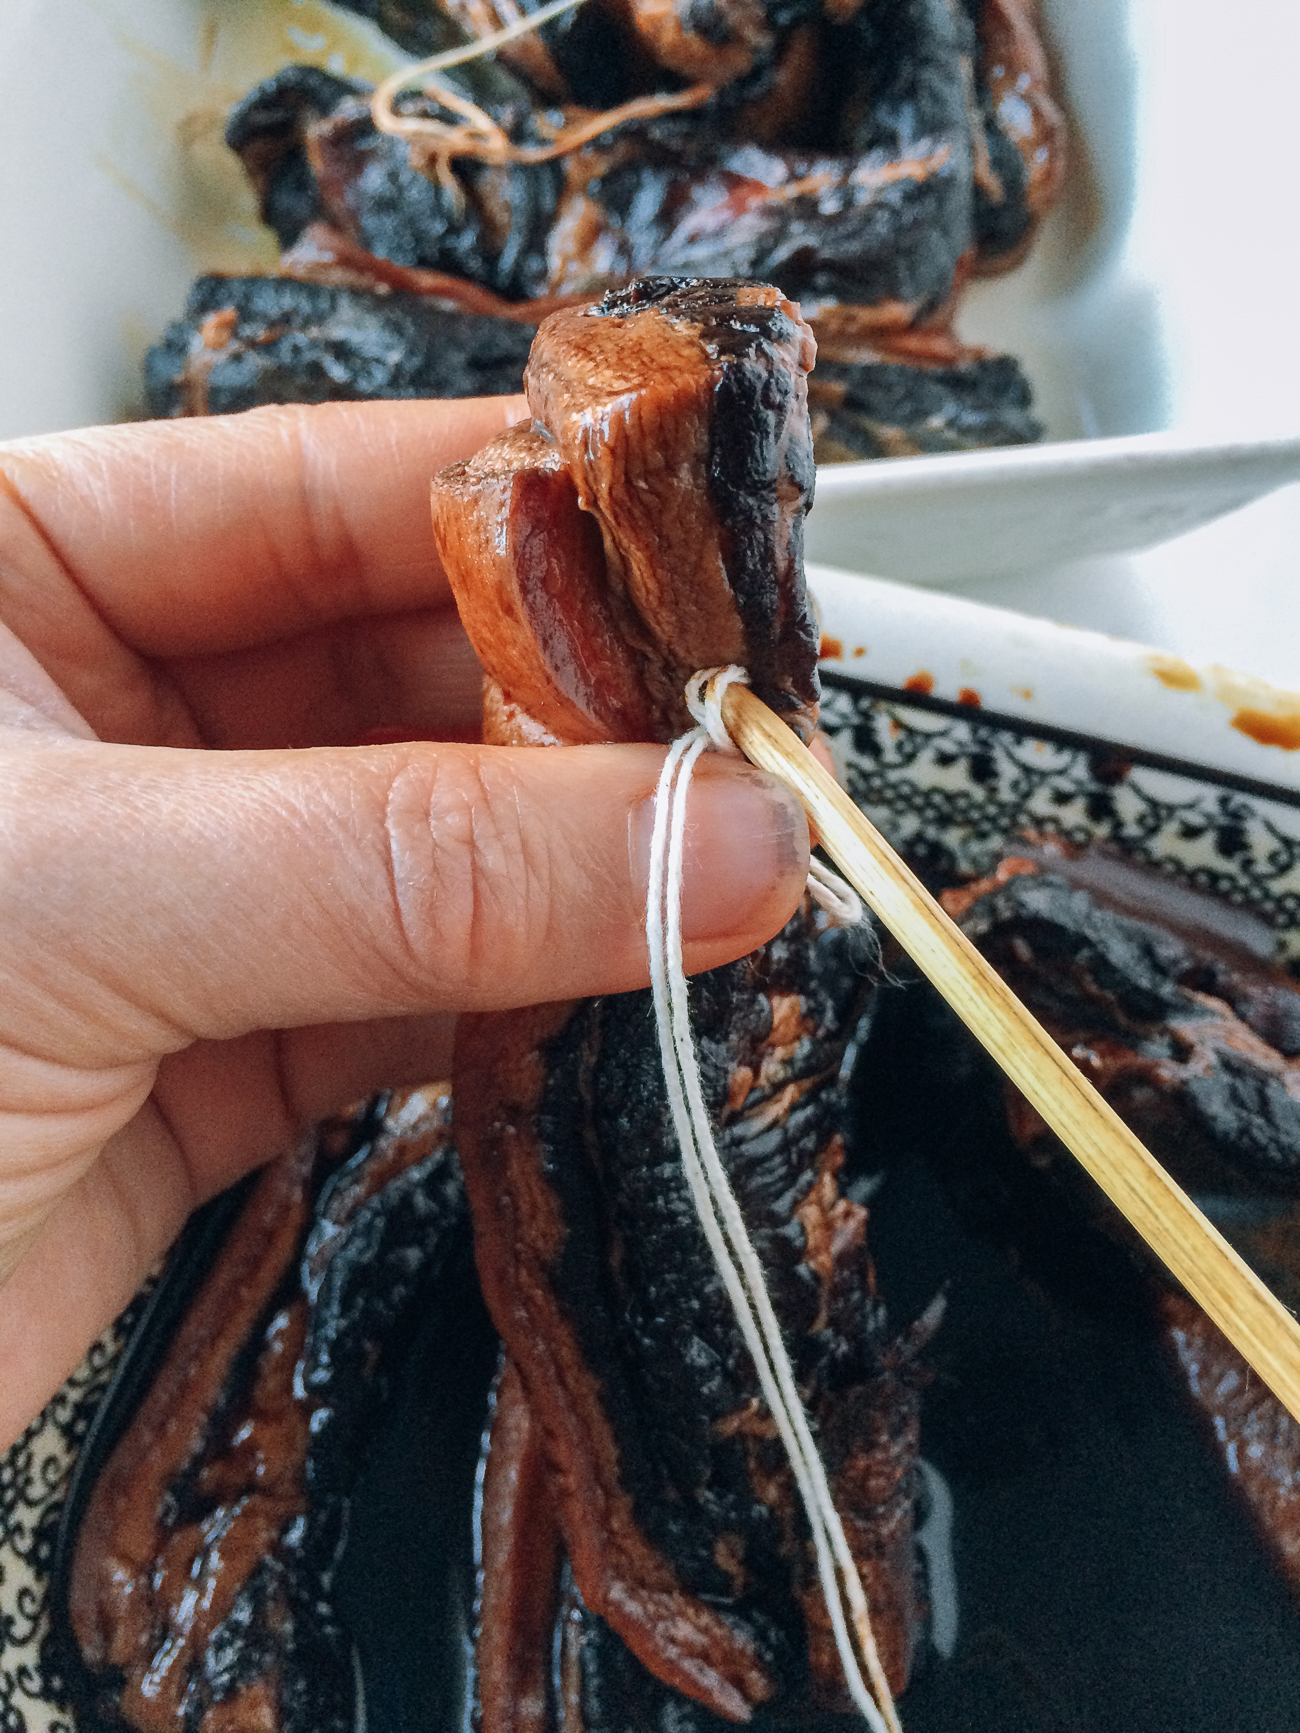
Tie a knot to make a sturdy loop, and hang the pork belly in a cool dry place. I used our basement, which has optimal temperature and humidity levels.
You want the temperature to remain around 50 to 55°F (10 to 13°C), and the relative humidity around 65%.
I kept the window open during the day to let in fresh air. The window is screened and we close off the room to keep out houses flies and any other critters out. If you do not have a source of fresh air, run a fan pointed at the pork belly to keep air flowing around it.

NOTE!
If it isn’t already obvious, this cured pork belly is best made during the colder months!
Oh, if you have any pets in the house, keep them away from the pork! As you can see in the photo below, Barley was very interested…
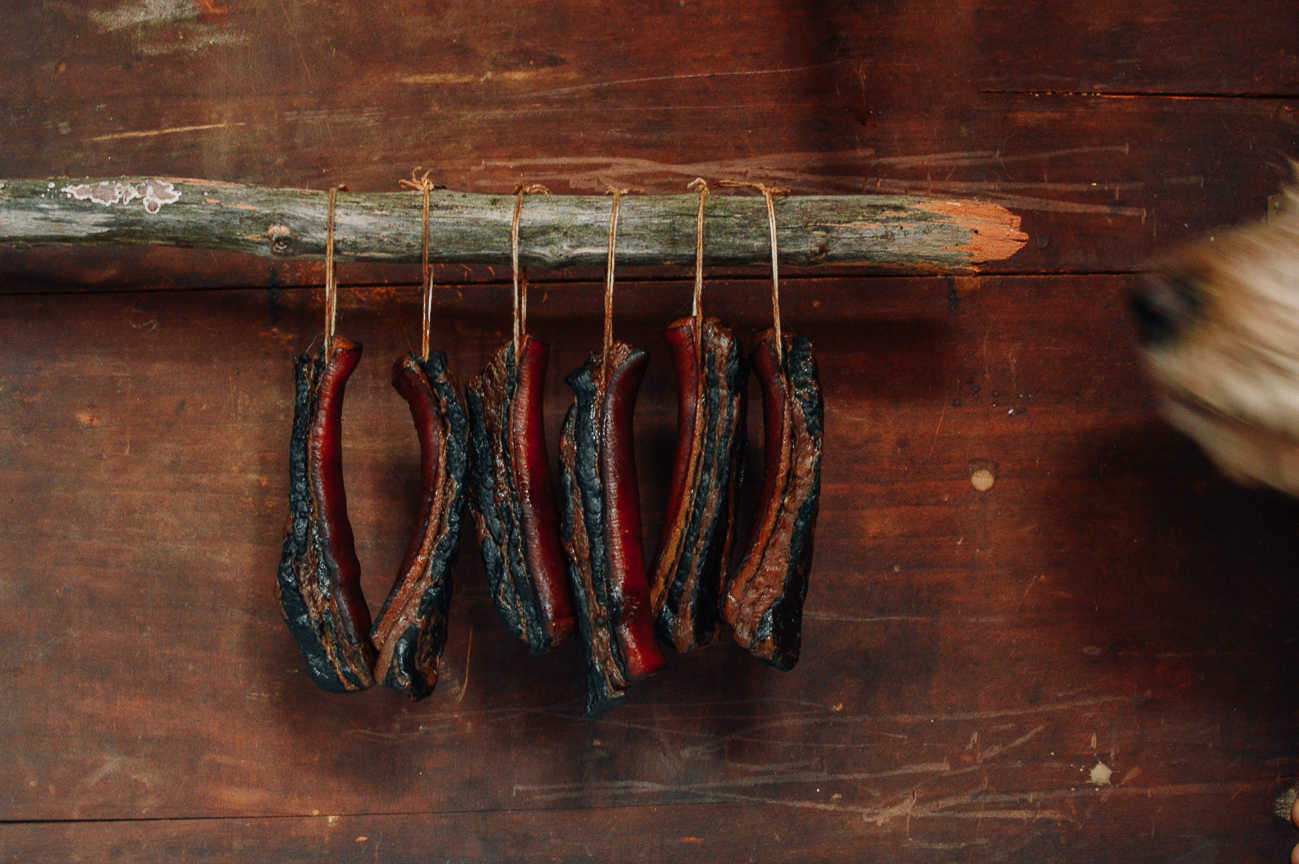
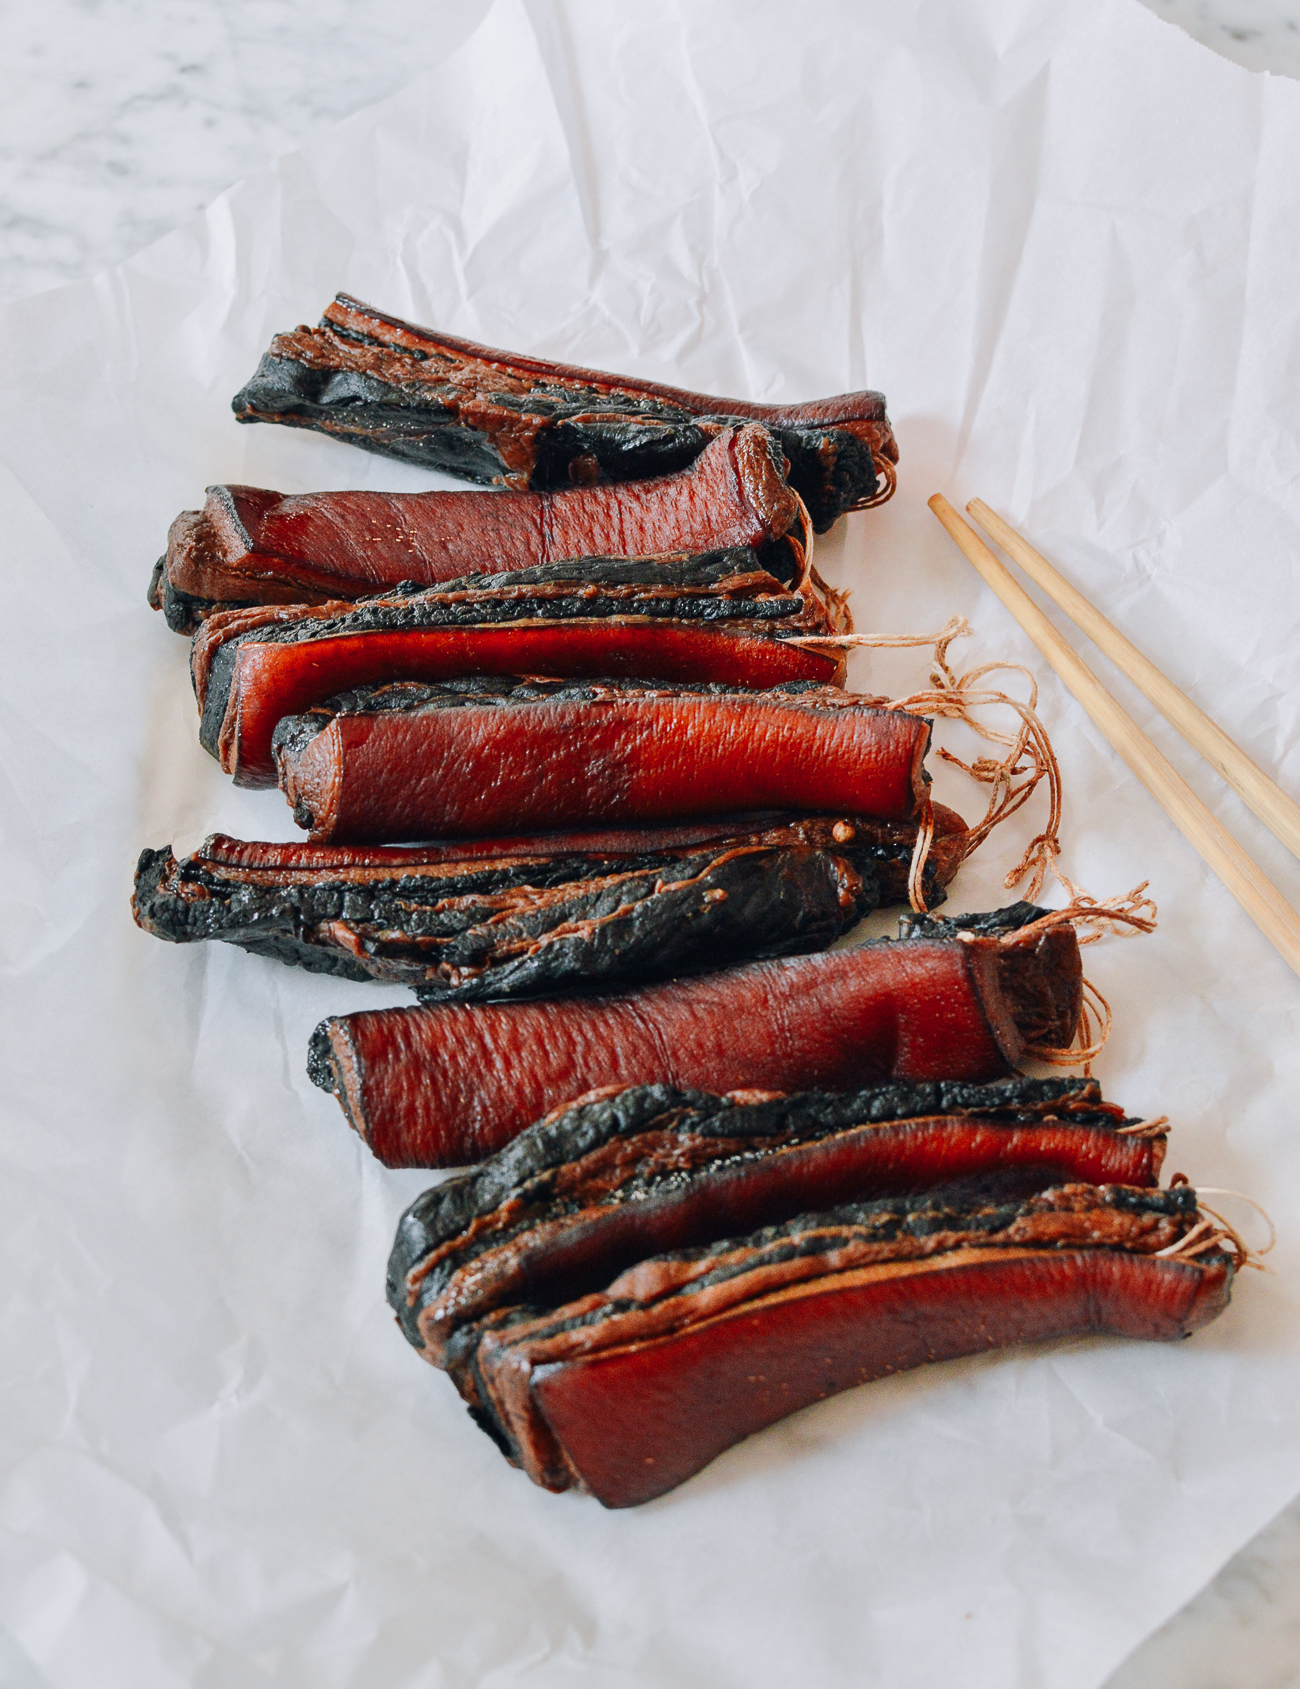
Layer some newspaper over some plastic on the floor to catch any liquid that drips from the pork, and let it dry for 4-6 days until the outer layer is completely dry and the inside is still slightly soft when pressed.
You can even cure this pork belly outdoors, as long as it is cold and dry. It’s best if the temperature is above freezing (you don’t want the pork to freeze solid), but below 50°F. Some sun is okay, and is actually good for curing!
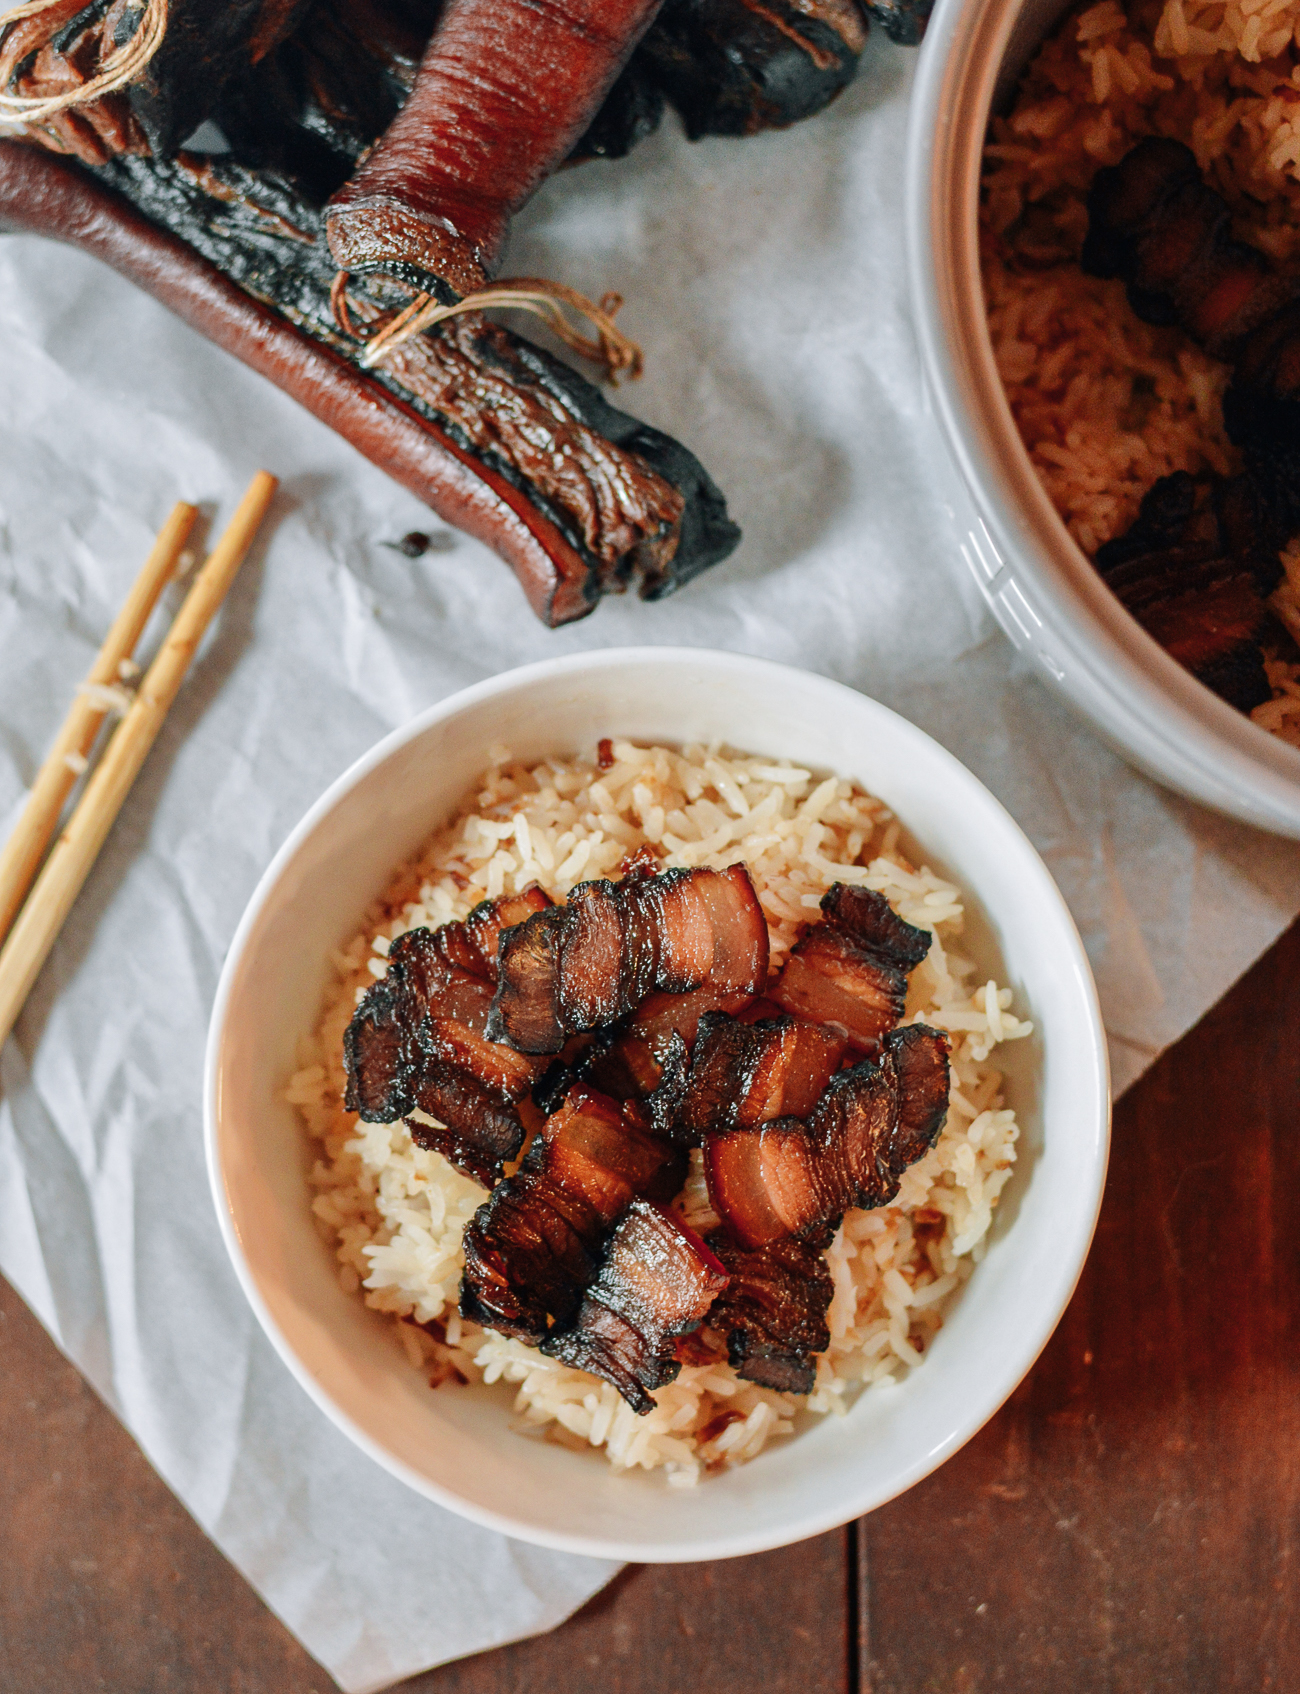
To store, put in a freezer bag with as much air removed as possible. You can freeze them for up to 3 months (for best quality, or up to 1 year!) for dishes like this Hong Kong Style Clay Pot Rice.
Clay pot rice is a well-known dish in Hong Kong and Guangdong in the winter months. You want to know how popular? It’s so popular that many restaurants start making them before customers actually walk in the door.
This is how certain they are that they will be sold. Along with some blanched choy sum, you got yourself a perfect comforting meal that’s over the top. And that’s just one other application for this cured pork belly!
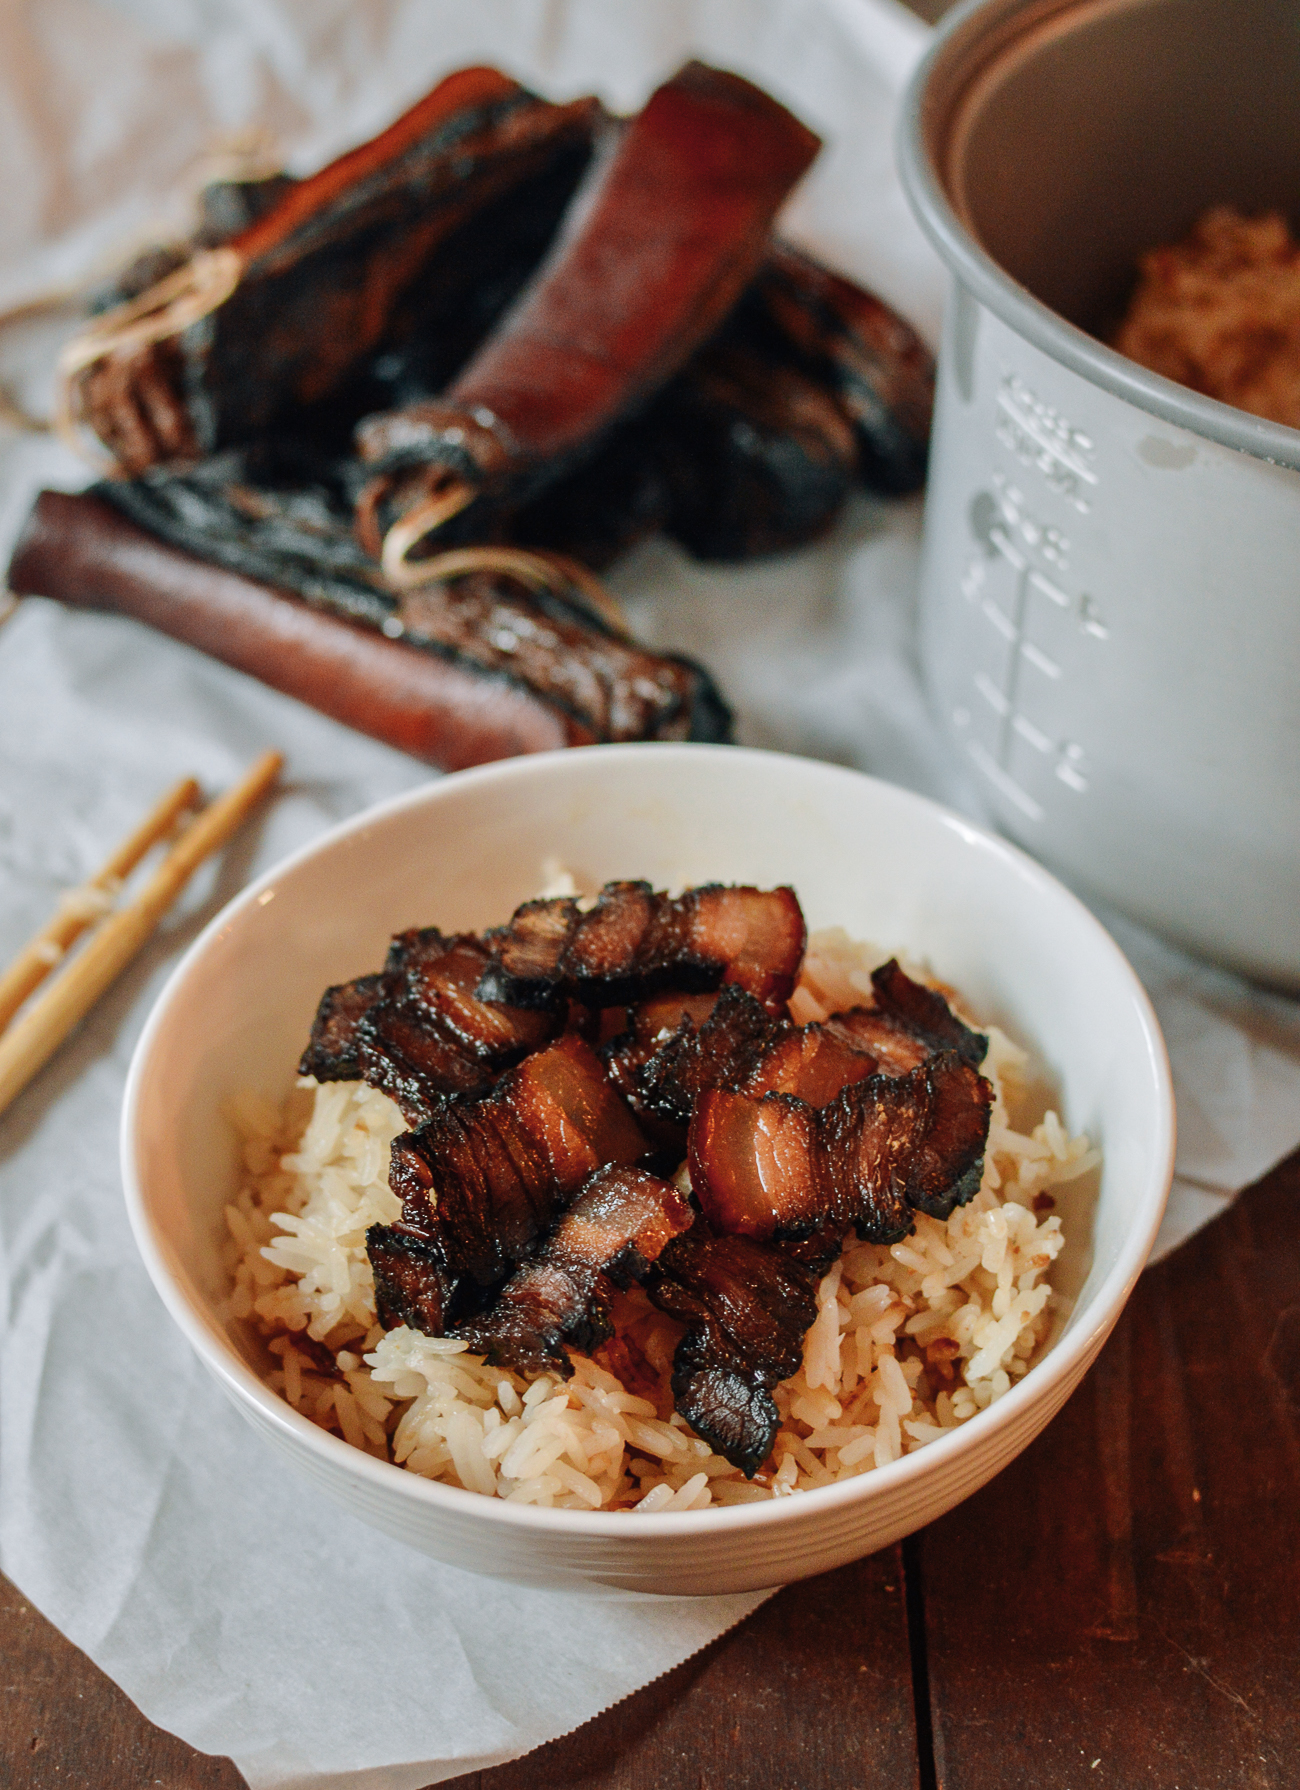
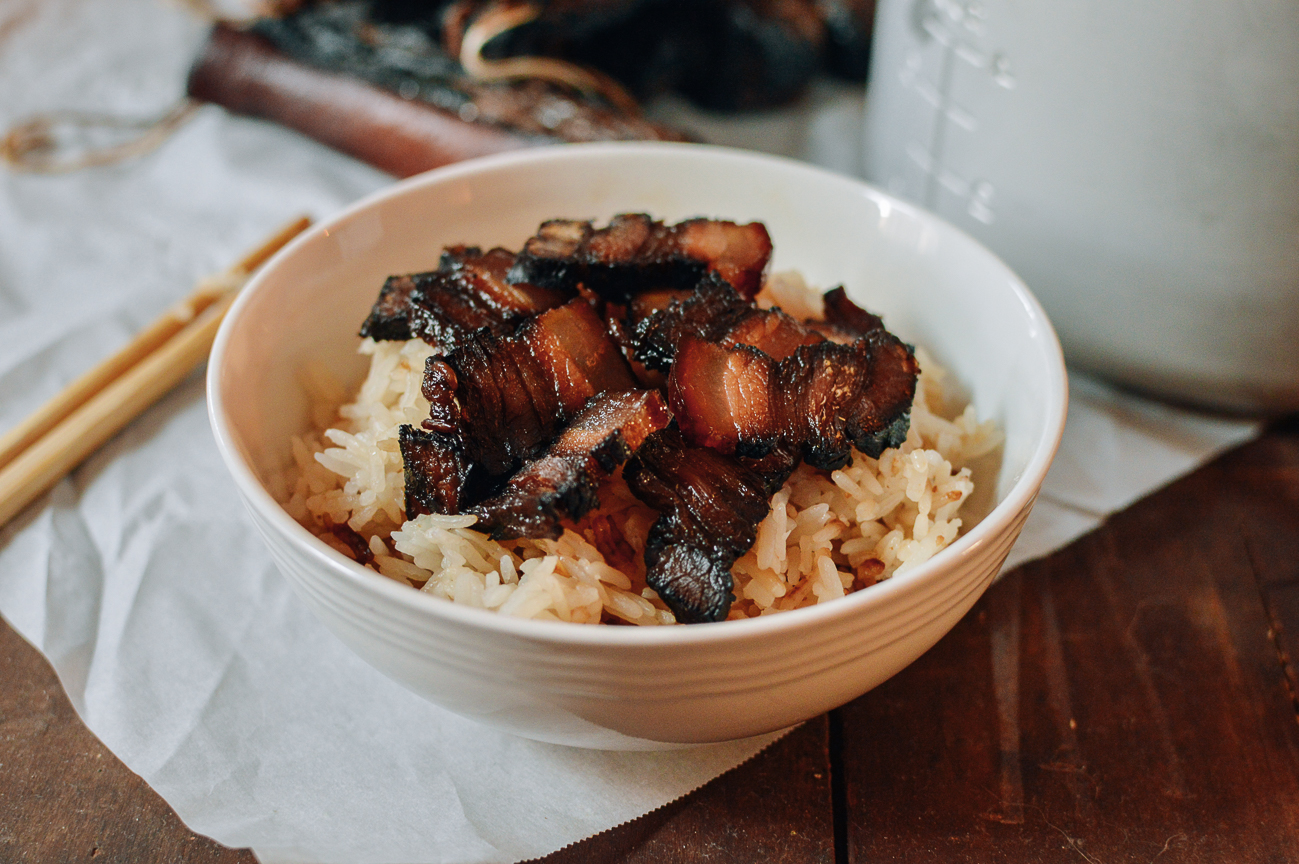
To prepare this pork belly in the most simple (and delicious) way, just add rice and water to your rice cooker as you normally would to cook a batch of white rice. Then just toss a piece of this cured pork belly on top, close the lid and press START.
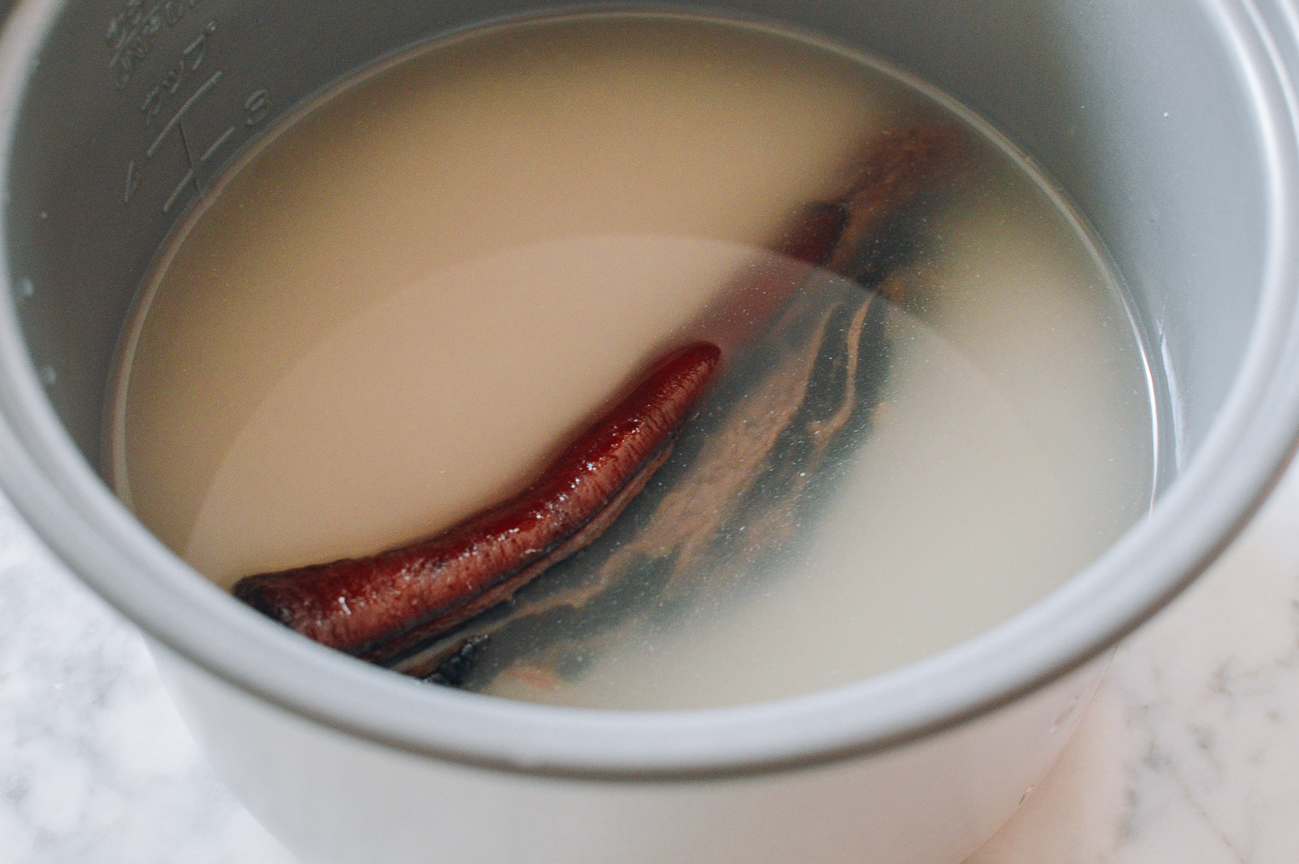
Once the rice is done steaming, your pork belly will also be heated through. Slice up your lap yuk and mix it with your rice!
It is soooo good!
Here are some of our favorite recipes to make with this Lap yuk!
Chinese Sausage Rice cook lop cheung (and lop yuk)
Stir Fried Cured Pork Belly and Leeks
Side note: Barley could barely contain herself while we were taking photos for this post. We had to shoo her away from the delicious smell of cured pork belly quite a few times!
Watch video!

Looking for more authentic recipes? Subscribe to our email list and be sure to follow us on Pinterest, Facebook, Instagram, and Youtube!
Recipe

Chinese Cured Pork Belly
Ingredients
- 3 slices ginger
- 4 bay leaves
- 2 star anise
- 2 cinnamon sticks
- 1 teaspoon Sichuan peppercorns
- 1 tablespoon salt
- 1/3 cup dark soy sauce
- 1/2 cup light soy sauce
- 1 cup Shaoxing wine
- 3/4 cup sugar
- 3 1/2 lbs boneless pork belly
- 3 tablespoons baijiu (a Chinese liquor; can substitute whiskey)
Instructions
- In a small saucepan, add the ginger, bay leaves, star anise, cinnamon sticks, peppercorns, soy sauces, Shaoxing wine, and sugar. Place the pot over medium heat, and bring the mixture to a simmer, stirring to dissolve the sugar. The process should only take a few minutes. Shut off the heat and allow to cool completely.
- While waiting for the sauce to cool, rinse the pork belly and pat dry thoroughly with paper towels. The pork should be as dry as possible. Arrange the pieces neatly in a shallow, rimmed dish.
- Once the sauce has completely cooled, stir in the baijiu or whiskey. Pour the mixture over the pork, making sure the meat is completely submerged. You can even put a clean plate or bowl on top to weight down the meat. Cover tightly and refrigerate for 3 full days, flipping the pork belly once each day to ensure the sauce penetrates the meat evenly.
- After 3 days, it’s time to hang them up to cure. Use kitchen string and a bamboo skewer to thread the string through the fat in the pork belly. Tie a knot to make a sturdy loop, and hang the pork belly in a cool dry place. I used our basement, which has optimal temperature and humidity levels (you want the temperature to remain around 50-55°F (10-13°C), and the relative humidity should be around 65%. I kept the window open during the day to let in fresh air. Note: this cured pork belly is best made during the colder months!
- Layer some newspaper on the floor to catch any liquid that drips from the pork, and let it dry for 4 to 6 days until the outer layer is completely dry and the inside is still slightly soft when pressed. To store, put in a freezer bag with as much air removed as possible.
- To prepare this pork belly in the most simple (and delicious) way, just add rice and water to your rice cooker as you normally would to cook a batch of white rice. Then just toss a piece of pork belly on top and steam as normal. Once the rice is done steaming, your pork belly will also be heated through. Slice it up and mix it with your rice!


