Thanksgiving is one of my absolute favorite holidays, for three big reasons:
1. It involves my favorite meal of the year (…Top 5 at least).
2. It heralds the start of nonstop Christmas music on the radio. Because I’m a weirdo who never gets tired of Perry Como and Nat King Cole singing about chestnuts on open fires/the only person on earth who still listens to the radio.
3. Pie. Thanksgiving is by far, the biggest of the pie holidays.
The big day is in just a week and a half, and it’s time to start thinking about cooking your bird. I’ve always been a bit puzzled by people making such a huge deal out of their Thanksgiving turkeys. I mean…turkey help hotlines? Brine recipes? Electric meat saws?
It’s all a little too much.
Why We Make THIS Recipe Every Year
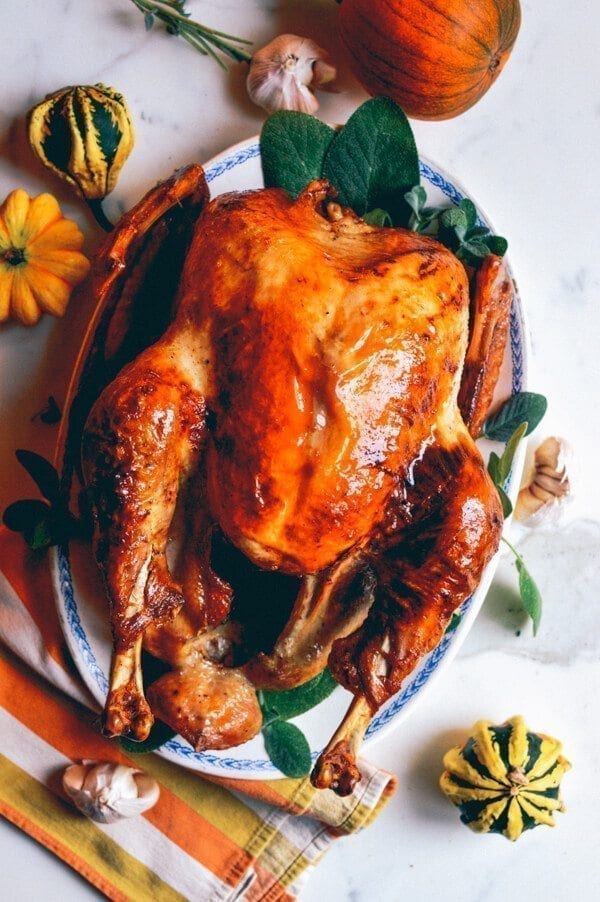
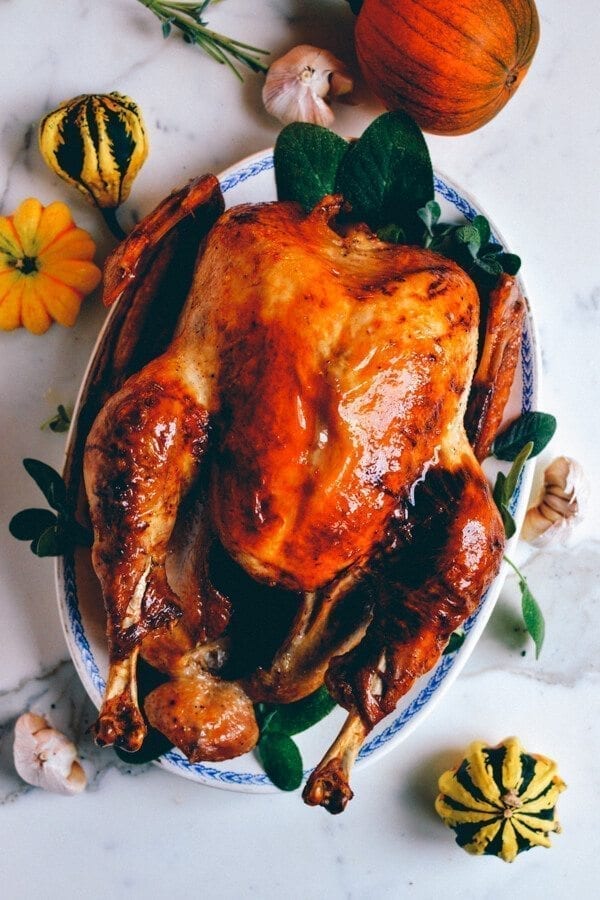
For as long as I can remember, this has been the Thanksgiving turkey recipe prepared in our house every Thanksgiving without fail. My grandfather, a chef by trade, would use this method to roast chickens at the restaurant he worked in, and for turkey every holiday season. He passed the recipe down to my parents, and they let my sister and me in on the secret of how to cook a turkey perfectly.
This Thanksgiving turkey recipe requires no large plastic tubs, surgical gloves, brining spices, or deep fat fryers. You don’t even need many ingredients.
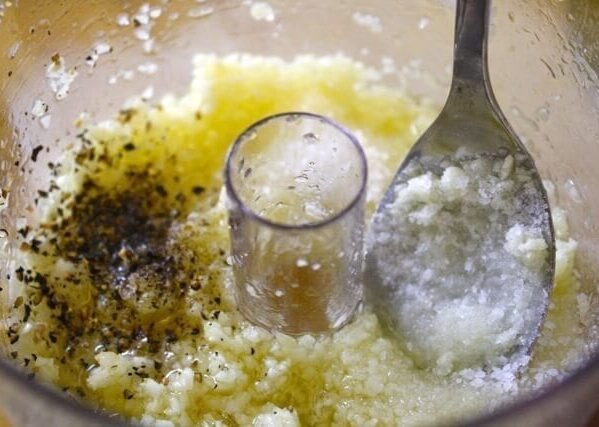
There’s no complex preparation in advance, beyond whipping up a quick marinade in the food processor (the recipe works just as well with a regular knife and cutting board too), and it’s always awesome. The main flavor agents are garlic and salt, but you really don’t get a strong garlicky flavor after it’s cooking. It’s super mellow, really juicy and hands down, the best roast turkey we have had.
Ok, I’ve talked quite enough. Just as a heads up, we have a few Thanksgiving sides in the pipeline for the coming days, so look out for those and check out our collection of Holiday season and Thanksgiving recipes. Onward!
Grandpa’s Perfect Thanksgiving Turkey: Recipe Instructions
4-5 days before roasting (depending on the size of your turkey), start thawing your turkey in the refrigerator. Budget about 1 day of thawing time for every 5 pounds, so a 15 pound turkey would take around 3 days.
(If your turkey isn’t completely thawed the night before roasting, you can finish the thawing process in cold water, changing the water every 30 minutes. Be sure to return it to the refrigerator right after marinating.)
On the day before you plan to roast it, make the marinade by combining the garlic, salt, black pepper, olive oil, and butter in the food processor. Pulse until you have a very fine paste.
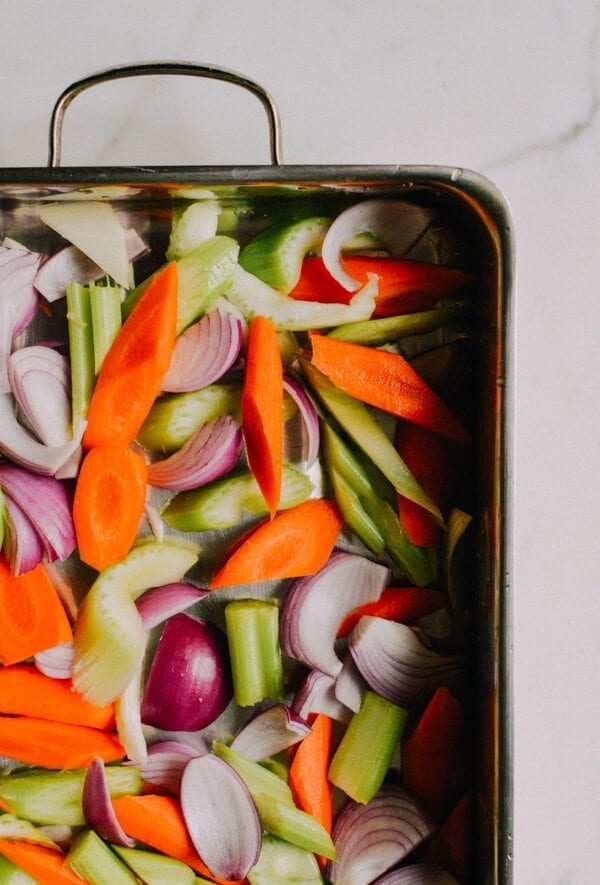
Put your carrots, celery, and onions on the bottom of your roasting pan. This will be the roasting “rack” that your turkey will sit on.
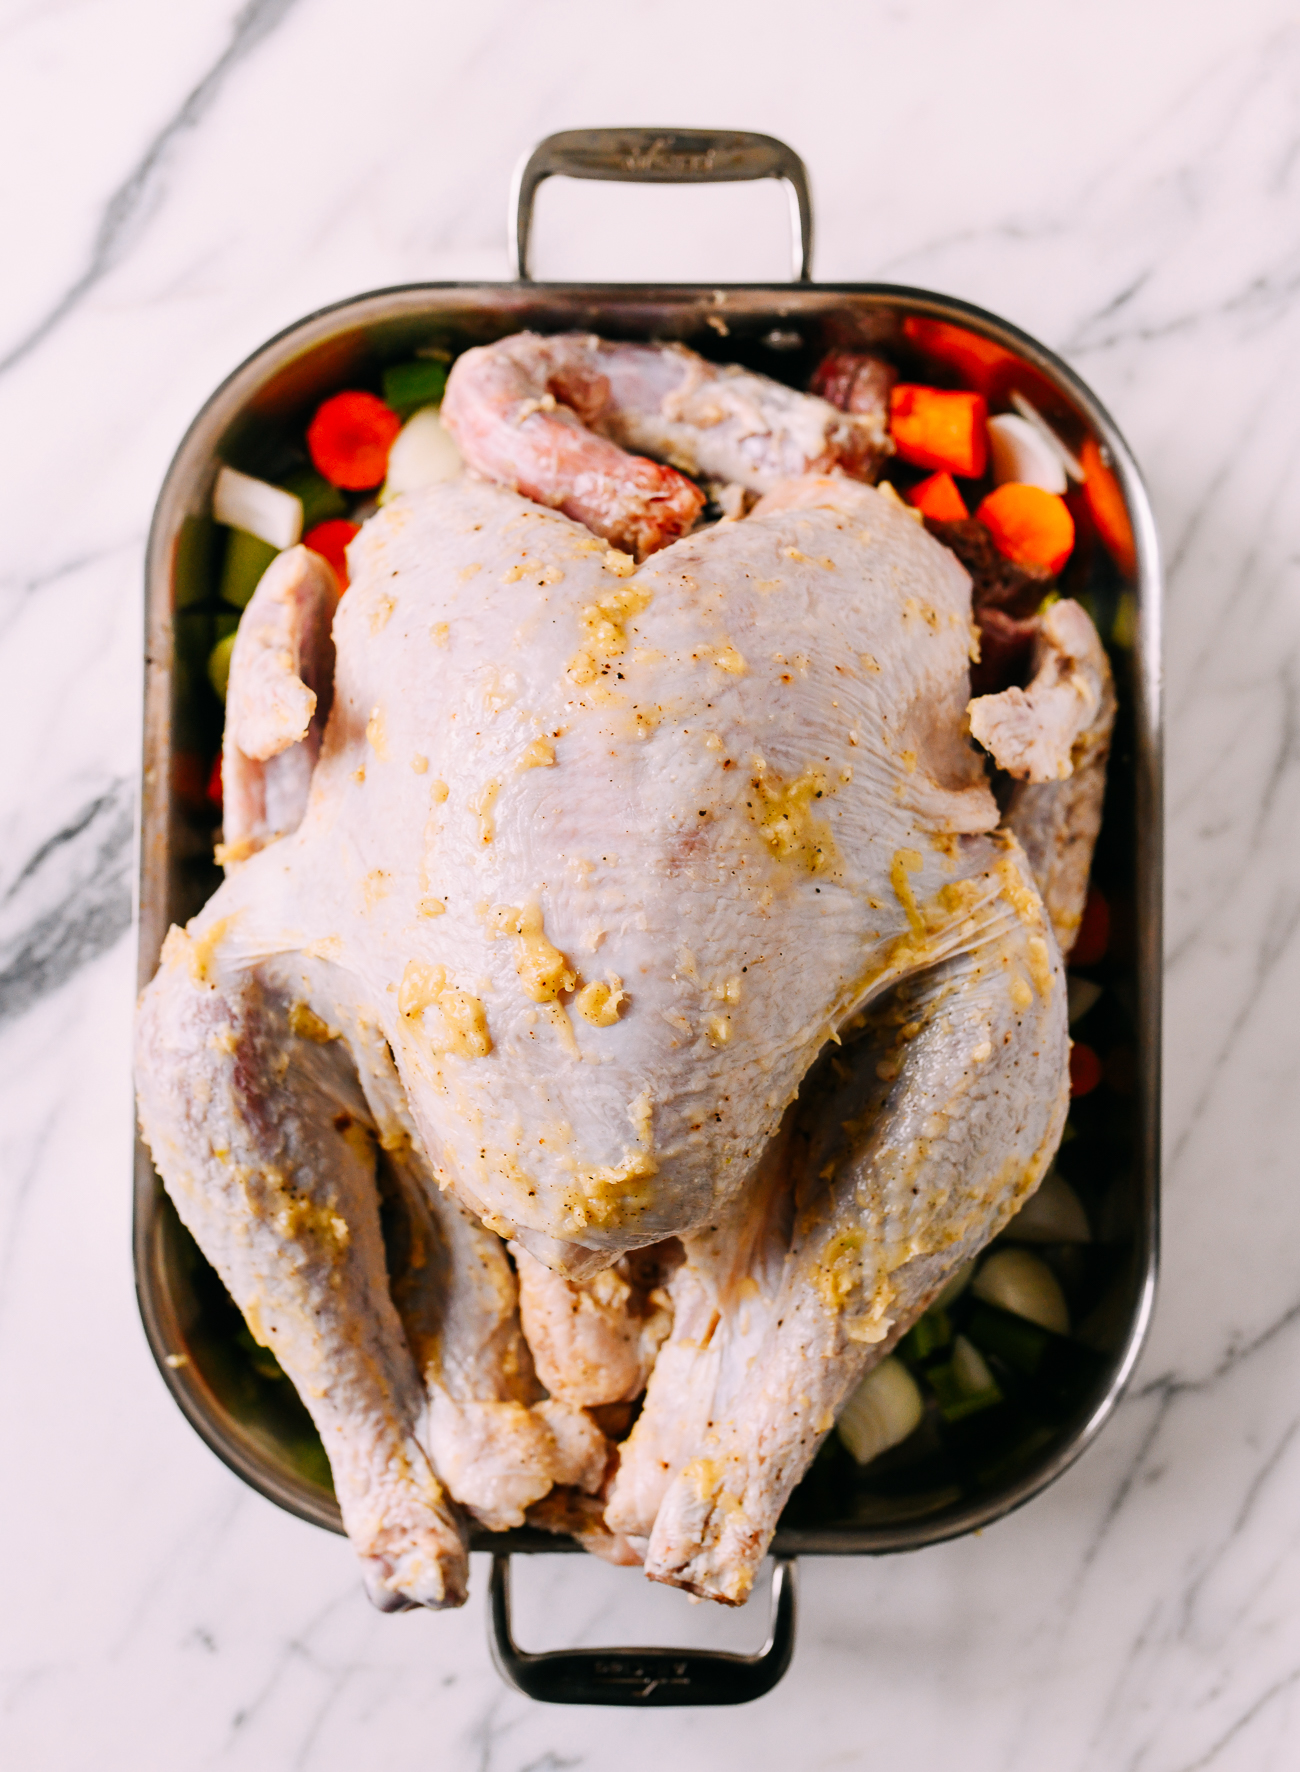
Remove the turkey from the package. Remove the neck and the giblets from the turkey cavity and give the bird a good rinse with cold water. Pat it thoroughly dry with paper towels, and lay it breast side up in the pan.
Ok, so before I go any further, you may have noticed that we didn’t say anything about removing the turkey tail. This KILLS me as I veg out on the couch watching Food Network Thanksgiving specials. The turkey tail is always mysteriously missing. Is this a regular thing? People wantonly chopping off the turkey tail for aesthetic reasons? It’s malarkey!
My nose-to-tail philosophy and general Asian street cred compel me to say: do. not. throw. away. the. tail.
Just trust me on this.
Ok, so spread half of your marinade all over the top side of the turkey, making sure you cover every surface and crevice, including the cavity. Flip the bird over so it’s laying breast side down, and spread the other half of the marinade over this side of the turkey. Cover the roasting pan tightly with plastic and allow to marinate overnight. You can also spread some marinade over the neck and the giblets and add them to the roasting pan as well.
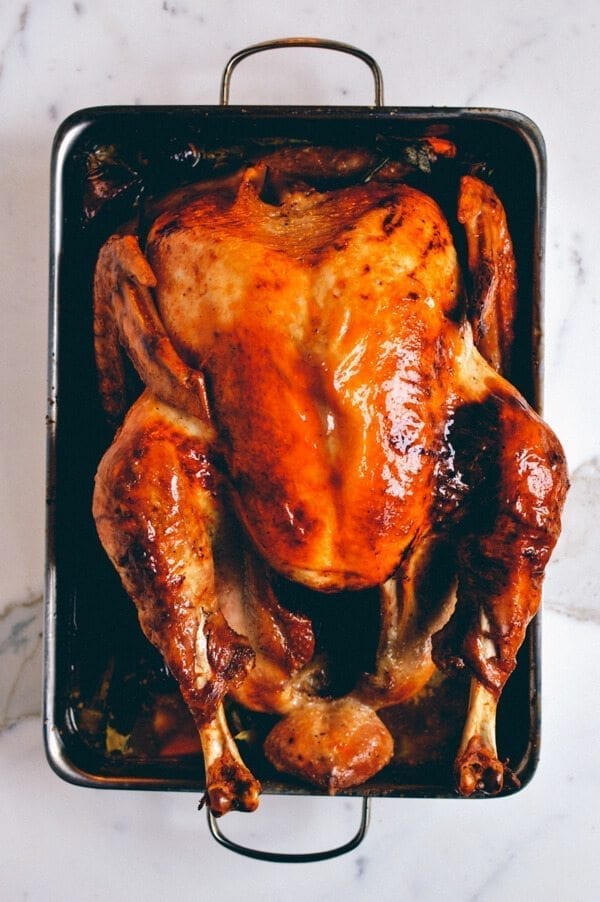
On the morning of the big day, take the turkey out of the fridge and let it sit on the counter (so you’re not putting a cold turkey directly into the oven, which can prevent it from cooking evenly). About 3 hours before you’re ready to eat, preheat the oven to 425 degrees F and arrange the oven rack so it’s in the lower third of the oven. Take the plastic off your roasting pan and lift up the turkey to empty any liquid that might have accumulated in the cavity as it sat out on the counter. Make sure the wings are tucked in, and roast at 425 degrees for 1 hour, rotating the pan halfway through.
Remove the turkey from the oven and lower the temperature to 325 degrees. Using clean kitchen towels or a sturdy wooden spoon, flip the turkey breast-side up. Roast the turkey at the lower temperature for another hour (for a 12 pound turkey) to an hour and a half (for a 14 pound turkey), until the thigh registers 165 degrees and the juices run clear (i.e. not pink). Rotate the pan halfway through the second roasting process as well.
Roasting Times & Tips for Different Sized Turkeys
We think a 14-15 pound turkey is the perfect size—it cooks quickly and evenly, and you have a good chance of both the thighs and breast finishing at the same time for juicy dark AND white meat.
If, however, you have a larger or smaller turkey, here are approximate roasting times.
| Turkey Weight | Roasting Time Breast-Side Down at 425°F/215°C | Roasting Time Breast-Side Up at 325°F/160°C | Total Roasting Time |
| 12 to 14 pounds (5.4-6.4 kg) | 1 hour | 1 to 1.5 hours | 2 to 2.5 hours |
| 15 to 17 pounds (6.8-7.7 kg) | 1 hour | 1.5 to 2 hours | 2.5 to 3 hours |
| 18 to 22 pounds (8.1-10kg) | 1 hour | 2 to 2.5 hours | 3 to 3.5 hours |
For instance, for an 18-pound turkey, you would roast for 1 hour breast-side-down at 425°F/215°C and then flip the turkey breast-side-up and roast at 325°F/160°C for 2 hours, for a total of 3 hours.
Important Notes:
- Be sure to increase or decrease marinade ingredients proportionally to any changes in turkey size. Click on the serving # in the recipe card below to scale the recipe up or down according to the weight of your turkey.
- Remember to rotate the roasting pan 180° halfway through the first hour of cooking, and then again halfway through the cooking time at 325°F/160°C. This will help ensure even cooking.
- If you’re cooking a larger turkey, tent the breast lightly with foil after it has turned golden brown, so it stays moist even with the extended cooking time.
- Towards the end of your estimated cooking time, it’s a good idea to test your turkey temperature with an instant-read thermometer inserted in the thickest part of the thigh, to prevent even slight overcooking!
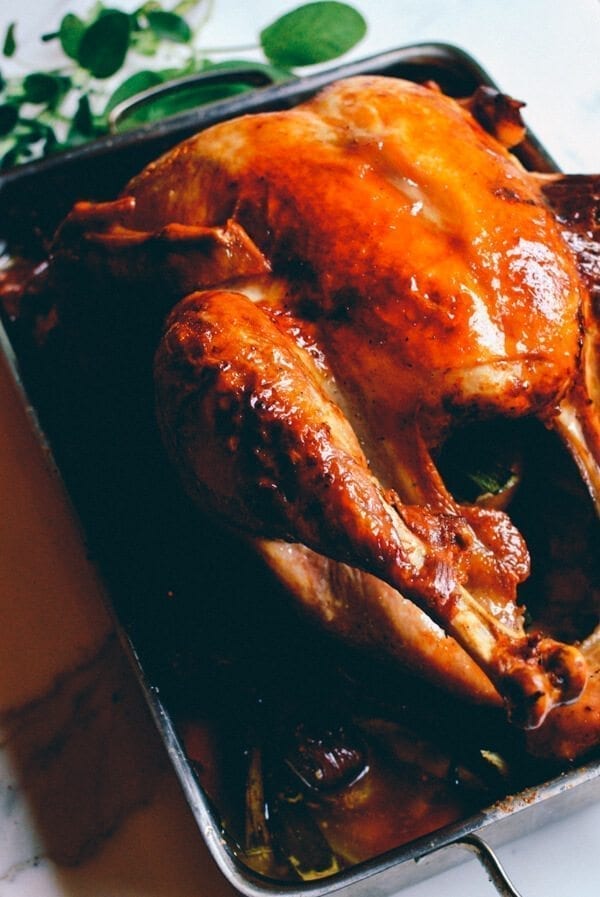
Remove your Thanksgiving turkey from the oven, transfer to a carving board or serving plate, cover loosely with foil, and allow to rest for 20-30 minutes before carving.
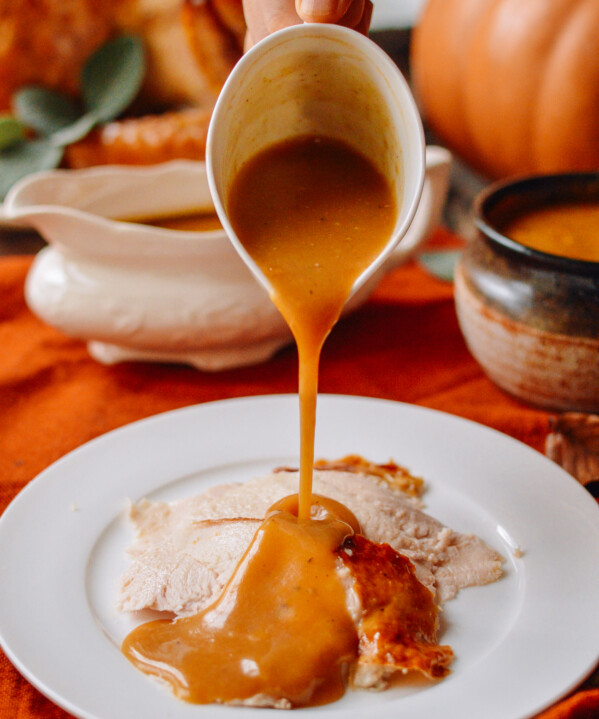
Now, we know everyone has their own method for gravy, but here’s ours: tip all the drippings from the roasting pan into a gravy separator. You want about 10 tablespoons of fat and 6 cups of the juices. If you don’t have enough of either, you can add butter (if you need more fat) and chicken stock (if you don’t have enough juice).
In a large saucepan over medium heat, add the turkey fat and/or butter. Gradually stir in enough flour to make a roux, whisking constantly. Continue whisking until the roux turns a dark brown color, about 10 minutes. Slowly whisk in the turkey juices and/or broth. Season with salt and black pepper to taste. Simmer until thickened (when it coats the back of a spoon, it’s perfect). If it’s too thick, add more broth or water. And that’s it!
This is the Thanksgiving turkey recipe that we always make, and it turns out perfectly every time. Plus, that turkey tail? Kaitlin and my dad fight over it every year. Every. Year. And then they just end up cutting it in half, and all is well with the world.
Happy almost Thanksgiving everyone!
Behind-the-scenes note: we made this Thanksgiving turkey in September to prepare for this very post. #doublethanksgiving #foodbloggerperks #AWESOME.
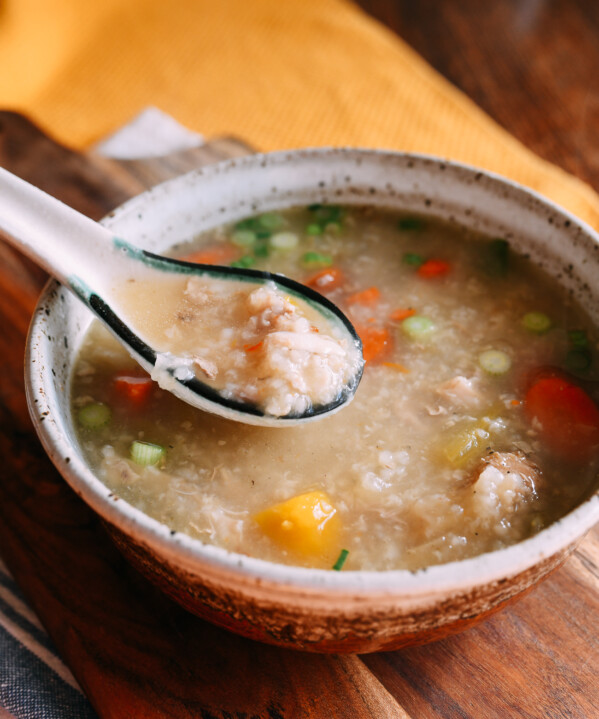
Oh, and one last point about your turkey. Keep the turkey carcass for the next day to make our Leftover Turkey Congee or a satisfying Leftover Turkey Ramen!
Grandpa’s Perfect Thanksgiving Turkey Recipe
Ingredients
Instructions
- 4-5 days before roasting (depending on the size of your turkey), start thawing your turkey in the refrigerator. Budget about 1 day of thawing time for every 5 pounds. On the day before you plan to roast it, make the marinade by combining the garlic, salt, black pepper, olive oil, and butter in the food processor. Pulse until you have a very fine paste.
- Put your carrots, celery, and onions on the bottom of your roasting pan. This will be the roasting “rack” that your turkey will sit on.
- Remove the turkey from the package. Remove the neck and the giblets from the turkey cavity and give the bird a good rinse with cold water. Pat it thoroughly dry with paper towels, and lay it breast side up in the pan.
- Spread half of your marinade all over the top side of the turkey, making sure you cover every surface and crevice, including the cavity. Flip the bird over so it’s laying breast side down, and spread the other half of the marinade over this side of the turkey. Cover the roasting pan tightly with plastic and allow to marinate overnight. You can also spread some marinade over the neck and the giblets and add them to the roasting pan as well.
- On the morning of the big day, take the turkey out of the fridge and let it sit on the counter (so you’re not putting a cold turkey directly into the oven, which can prevent it from cooking evenly). About 3 hours before you’re ready to eat, preheat the oven to 425 degrees F and arrange the oven rack so it’s in the lower third of the oven. Take the plastic off your roasting pan and lift up the turkey to empty any liquid that might have accumulated in the cavity as it sat out on the counter. Make sure the wings are tucked in, and roast at 425 degrees for 1 hour, rotating the pan halfway through.
- Remove the turkey from the oven and lower the temperature to 325 degrees. Using clean kitchen towels or a sturdy wooden spoon, flip the turkey breast-side up. Roast the turkey at the lower temperature for another hour (for a 12 pound turkey) to an hour and a half (for a 14 pound turkey), until the thigh registers 165 degrees and the juices run clear (i.e. not pink). Rotate the pan halfway through the second roasting process as well.
- Remove the turkey from the oven, transfer to a carving board or serving plate, cover loosely with foil, and allow to rest for 20-30 minutes before carving.
- Now, we know everyone has their own method for gravy, but here’s ours: tip all the drippings from the roasting pan into a gravy separator. You want about 10 tablespoons of fat and 6 cups of the juices. If you don’t have enough of either, you can add butter (if you need more fat) and chicken stock (if you don’t have enough juice). In a large saucepan over medium heat, add the turkey fat and/or butter. Gradually stir in enough flour to make a roux, whisking constantly. Continue whisking until the roux turns a dark brown color, about 10 minutes. Slowly whisk in the turkey juices and/or broth. Season with salt and black pepper to taste. Simmer until thickened (when it coats the back of a spoon, it’s perfect). If it’s too thick, add more broth or water. That’s it!