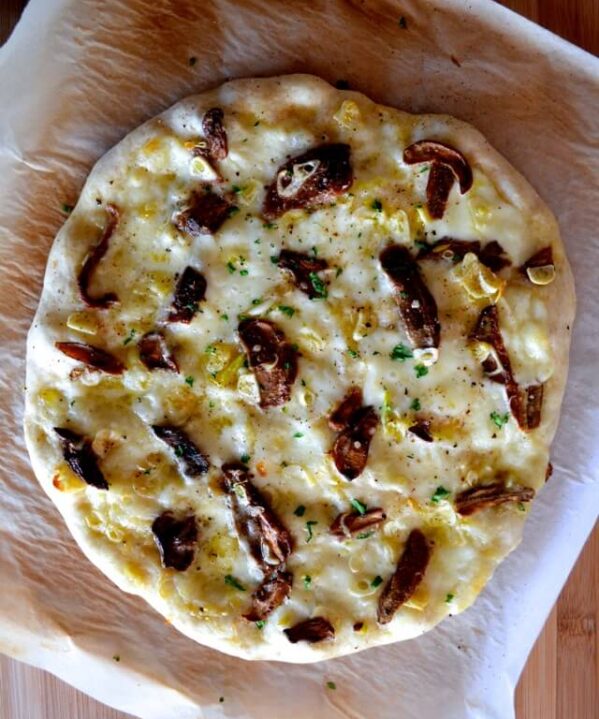
Back in good old 2014, my parents and sister posted a recipe for foolproof pizza dough from the Beijing homestead. There you will find a perfectly lovely recipe for a Wild Mushroom & Garlic White Pizza and funny reflections on our obsession with this favoritest of foods. More on this in a sec.
Well the other day, we had pizza for a quiet Saturday night at home. The crust came out perfect, as per usual–chewy but with a good crunch, a crispy bottom, and the most pleasing sprinkling of crust bubbles. As we chowed down, we realized that our original post was completely and utterly botched by the tiny, weak pansy oven we had in Beijing. Actually, ALL of our pizza/flatbread recipes up until now were produced in said oven.
Well, in our suburban Jersey kitchen we’ve got a powerful oven that reliably goes up to 525 degrees, and a pizza stone that we paid way too much for at Williams-Sonoma. This means better crust coloring, seriously excellent crust bubble formation, and a need for an updated post!
I should also mention that there seems to be a funny dynamic in our household… While I may not have the most skill with recipe-following in general (see my bio), I do have some pretty kick-butt skills when it comes to a certain few. This has been proven by the unfortunate inadequacies resulting from the same recipe produced by different hands…but I won’t name names. *cough* Dad *cough.*
Now look, the laaaaast thing I want to do is brag, but it has to be said that something in my tiny hands knows the right consistency and shape required to achieve the perfect–and I mean perfect–at-home pizza crust. While the recipe credit must all go to Mr. Jamie Oliver, there is a little more finesse required to get a truly great result that isn’t outlined in his instructions.
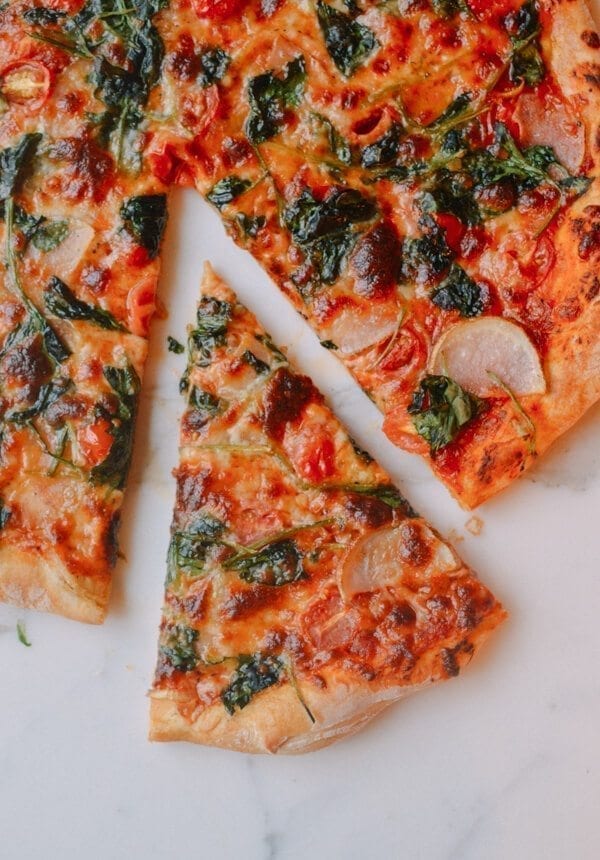
So without further ado, our redux of Foolproof Pizza Dough, PACKED with detail to get a truly perfect pizza that rivals some of the best, and two accompanying recipes: Veggie Supreme Pizza and a Spinach and Sun-dried Tomato White Pizza.
Recipe Instructions
To make the pizza dough:
Let me preface this section by saying that I will go into LABORIOUS detail here. Sarah will kill me for it, but I’m just that kind of gal. You can read, or scroll down at your own risk. I won’t be insulted.
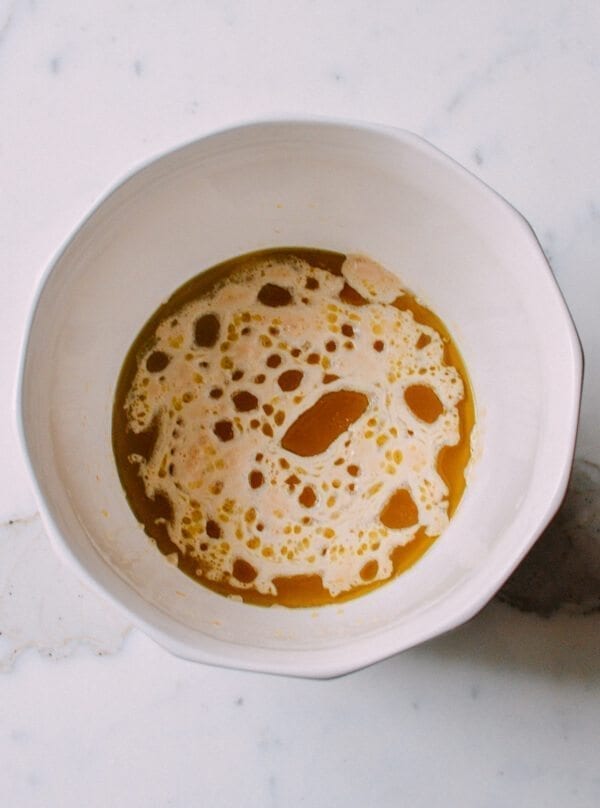
In a large bowl, dissolve the sugar in the warm water. Mix in the yeast with a fork, breaking up big clumps, and follow with the olive oil. Give it a quick stir and allow to sit for 15-20 minutes, until it’s uber-foamy and puffed up in the bowl!
When it’s good and foamy, start adding your flour one cup at a time, stirring with a wooden spoon or spatula. After the first cup, sprinkle the salt over the mixture evenly. Keep adding flour. After adding the fifth cup, assess your consistency–if it’s still quite wet, inch towards 6 cups.
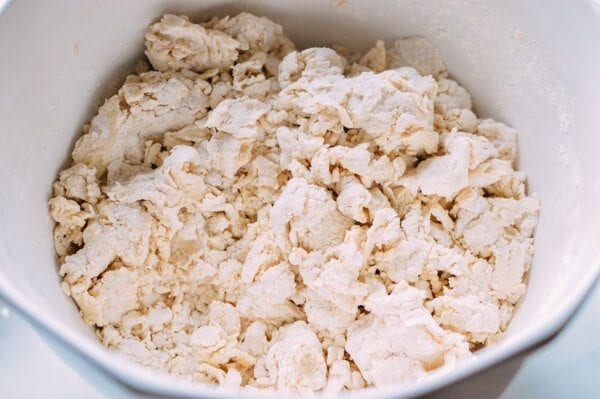
If it’s dry enough to start kneading, dive in with floured hands. I always leave some flour allowance between what I add during the mixing phase and the total stated because you’re going to add flour as you knead.
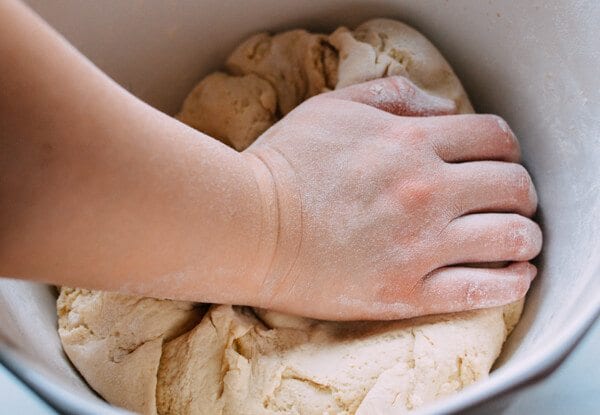
Knead the dough for 5-10 minutes, adding flour to make the dough smooth and elastic. It will stick to your hands in the beginning; just scrape it off and add more flour as you go. It’s helpful to measure out your remaining amount of flour (so 7 cups minus what you’ve already added before kneading) so you don’t surpass the maximum amount required as you marvel over your *lovely* dough.
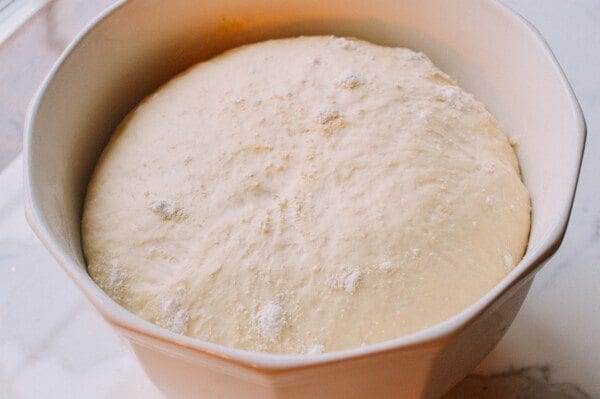
When the dough is smooth and elastic, and there are no more excess dough bits at the bottom of your bowl, sprinkle some fresh flour in the bottom of the bowl and on top of your dough…
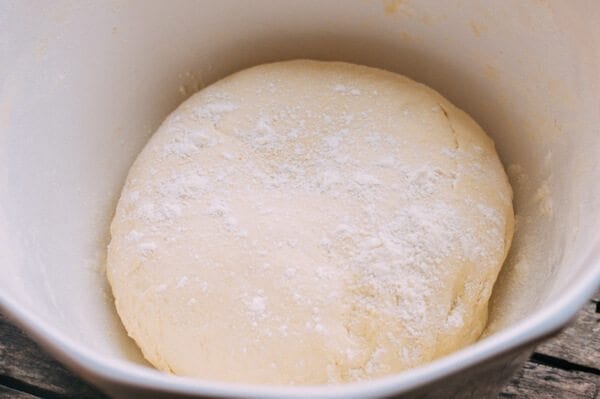
…Cover with a warm damp cloth, and let rise in a warm room or a closed oven for 1 hour, or until doubled in size.
At this point, you can punch the dough down, or cover the bowl with plastic wrap and put it in the fridge until you’re ready to use it. I like to use it right away because a dough that sits in the fridge too long starts to develop an unpleasant yeasty flavor, though others would probably contradict me.
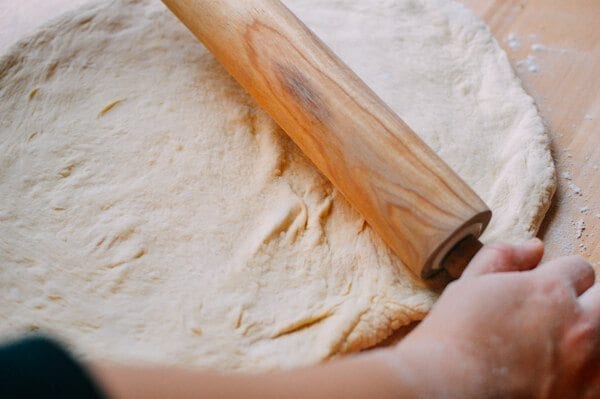
When you’re ready to roll out the crust, preheat your oven to 500 degrees. If you’re using a stone, make sure that’s in the oven. Liberally flour your board prior to rolling out your dough. I can’t emphasize this enough, because if you’ll be sliding your pizza onto a stone in the oven, it will need to be jiggly enough on your cutting board when weighed down with toppings to slide oh-so-effortlessly onto the stone. Seriously. You’ve been warned. You should be using a wooden board, will which act as your MacGyver-ed pizza peel, if you’re going the pizza stone route. If you’re using a sheet pan, just roll the dough out on the pan.
Okay, now comes the tricky part. Rolling out the dough. Seems simple–just grab your rolling pin and squidge the hell out of it until it’s a neat circle, right? WRONG.
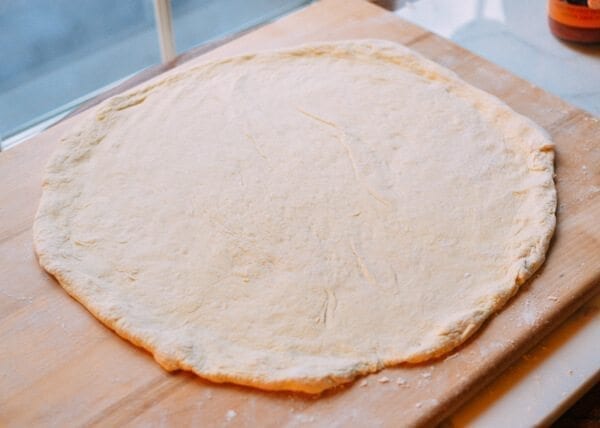
When you start with your gob of dough, you want to roughly shape it with floured hands into a flattish circle. At this point it will be thick–about an inch. Then you want to go in with the fists. We’re talkin’ pizzeria level technique here–but it’s seriously not hard! Just place the dough on your two fists and imagine that your making tiny little vertical fist pumps with your hands rotating slightly. As you do this, the dough will naturally stretch by its own weight. Better yet, the dough will stretch from the center (i.e. where your fists contact the dough), which means that you’ll end up with a slightly thicker edge. That’s your crust! Now your job is to make sure the dough stretches evenly and that no holes are allowed to punch through your lovely dough. You’ll want to do this until the dough is about a quarter inch thick. Unevenness within a range of 1/8″-1/4″ is totally fine. In fact, it’s your friend. Lay the dough down on your *liberally* floured board.
If you’re one of those people that is adamant about your pizza being, in fact, a circle, now is when you grab the rolling pin. Use the pin to roll out from the center, never allowing the pin to squish your crust. Rolling the dough out shouldn’t be in a traditional Paula-Deen-pie-crust way, but with the pin angled to follow the radius of the dough until you’ve achieved a circle with a raised crust. So you’re not rolling out from the center, you’re rolling around to follow the circle of the dough. Again, never letting the pin crush the crust. This means the pin should be angled ever so slightly at about 15-20 degrees to preserve crust height. If you see air bubbles–excellent, use the pin or your hands to gently push them to the edges (THESE WILL BE CRUST BUBBLES!).
Now. You’re ready for the veggie pizza toppings. You’ll need:
- Your bestest, favorite jarred or homemade tomato sauce, warmed
- 1 small onion, sliced thinly
- 1 block of mozzarella cheese, grated (we prefer regular ol’ mozz over fresh for these pizzas but feel free to go with fresh!)
- 1 cup grape tomatoes, halved
- 1 small potato, sliced into extremely thin rounds and tossed with olive oil, salt and pepper
- 1/3 of a Japanese eggplant, sliced into extremely thin rounds, tossed with olive oil, salt and pepper (disclaimer: we ran out of eggplant for photo-taking after making our test pizza, but it should be included if you like eggplant!)
- 3 cups spinach leaves, roughly chopped
- Large handful of fresh basil, torn (no one likes microscopic basil bits)
- Salt
- Freshly ground black pepper
- Extra virgin olive oil
- 2/3 cup ricotta cheese
- 1/4 cup sun-dried tomatoes, roughly chopped
Veggie Supreme Pizza:
Grab your sauce. Spread it evenly on your pie.
Now sprinkle over the sliced onions. (Topping before cheese? WHAT?! It works. Trust me.)
Then comes half the mozzarella cheese you want on this here one pie.

Then sprinkle over your grape tomatoes…

Followed by the potato and eggplant rounds… (eggplant not pictured…bah.)

Followed by the spinach and fresh basil…

Add the second half of the mozzarella cheese you want on this here one pie. Season with salt and pepper to taste.

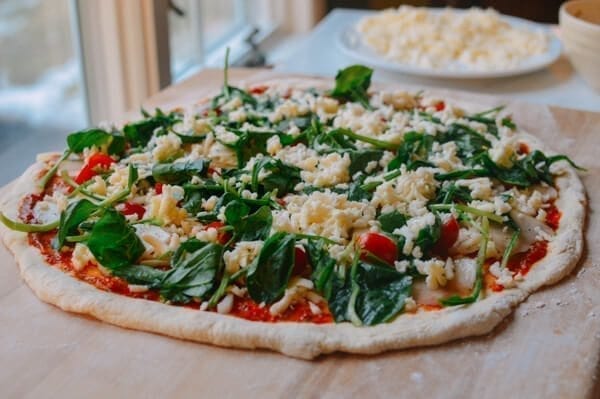
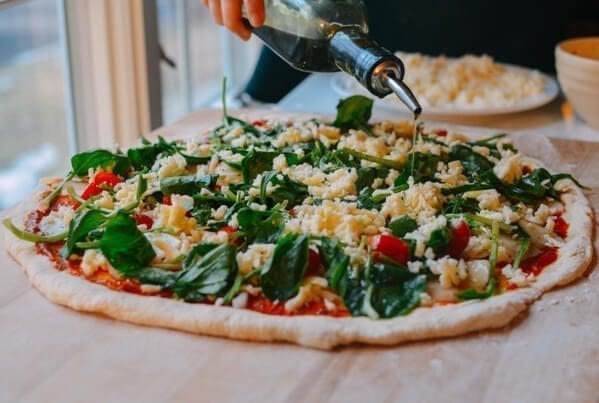
Finally, drizzle liberally with olive oil to ensure that the spinach and basil don’t get too dried out.
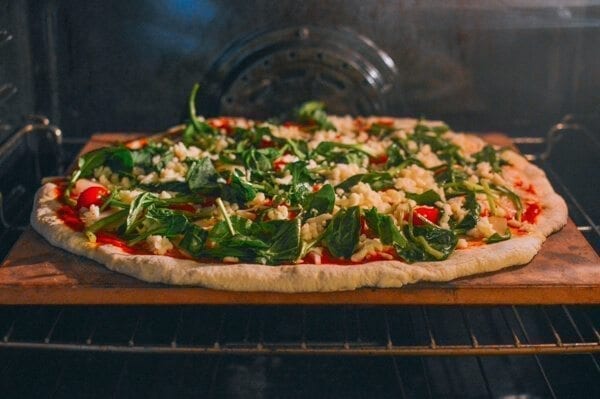
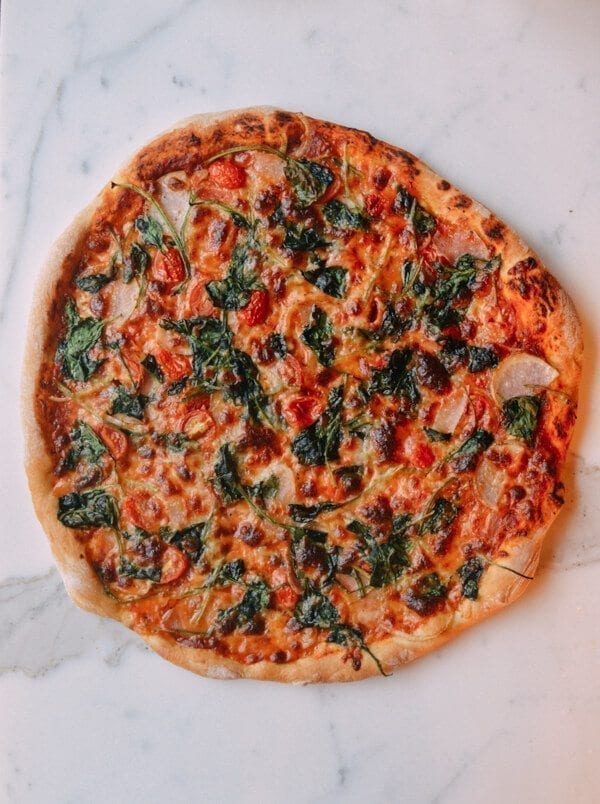
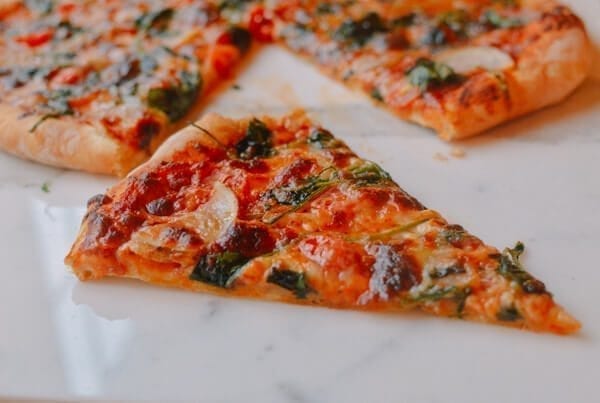
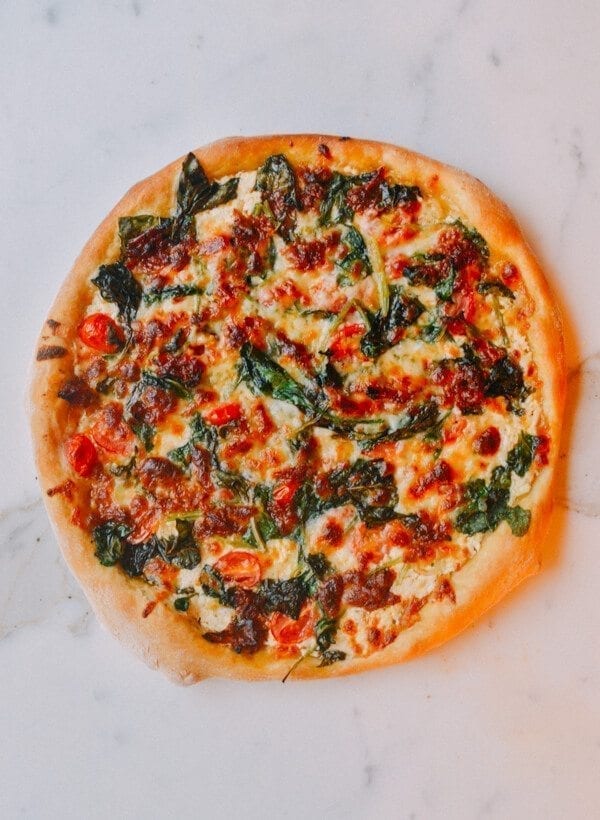
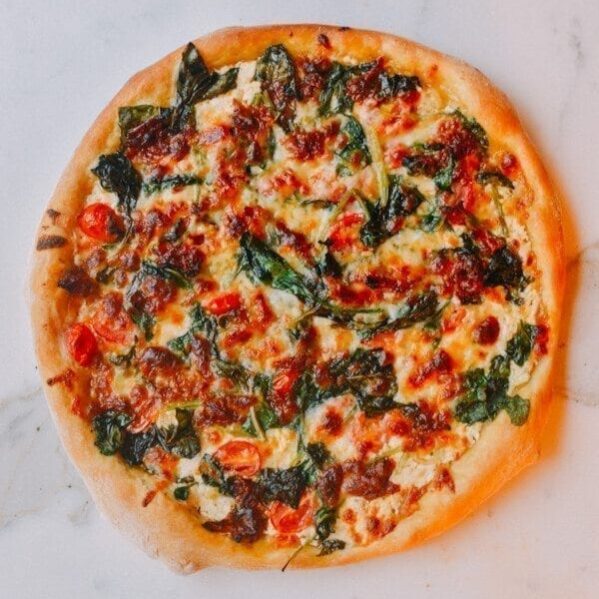
Bake your veggie pizza until crispy and melty, about 10-14 minutes, depending on how hot your oven really gets. The crust should be golden and just slightly charred in some places.
Spinach and Sun-Dried Tomato White Veggie Pizza
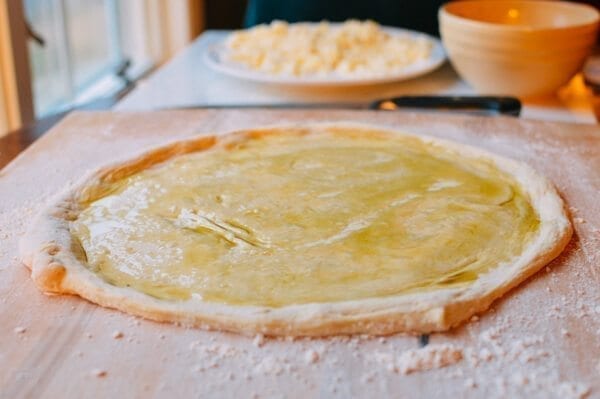
Spread a thin layer of olive oil over your crust.
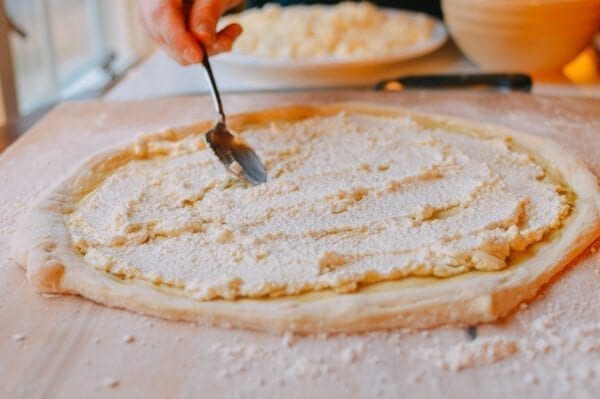
Then spoon gob-fuls of ricotta cheese around the pizza. Shmear them out a bit, but no need for perfection here.
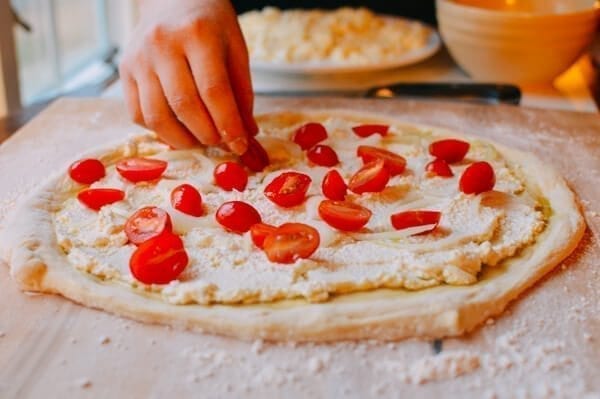
Sprinkle a bit of onion over the ricotta. Then dot the pie with cherry tomatoes.
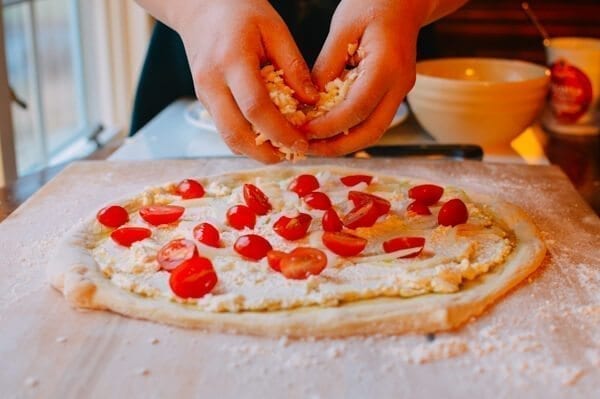
Sprinkle with half the mozzarella.
Followed by yer spinach and basil…

And then the chopped sun-dried tomato.
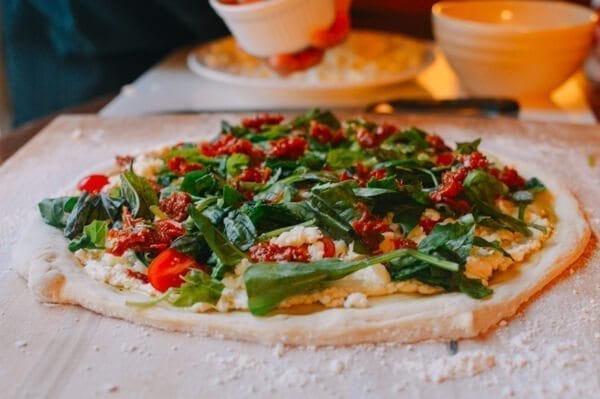
Finish with the second half of the mozzarella cheese you want on this here one pie. Season with salt and pepper to taste. Drizzle liberally with olive oil to ensure that the spinach and basil don’t get too dried out.
Bake in your preheated oven for 10-14 min.
And THAT, friends, is two variations on veggie pizza. I really hope this has been informative for any AMAZING folks who read all the way down to this point. There’s been a lot of homemade pizza trial-and-error in my young life, but I’ve officially been dubbed the informal master and commander of homemade pizza in the family. This veggie pizza post is the true COMPENDIUM of all my knowledge hereto and forthwith.
Now go forth and conquer!
Veggie Pizza and Kaitlin's Perfect Pizza Method!
Ingredients
For the dough:
- 2 1/2 cups warm water
- 1 tablespoon sugar
- 2 1/4 oz. packets active dry yeast (if you're using bulk yeast, use 4 1/2 teaspoons)
- 1/4 cup extra-virgin olive oil
- 7 cups bread flour or all-purpose flour (or a blend of the two! I've achieved excellent results with all combos)
- 1 level tablespoon fine sea salt
For the Pizza Toppings:
- Your favorite jarred or homemade tomato sauce (warmed)
- 1 small onion (sliced thinly)
- 1 block of mozzarella cheese (grated, we prefer regular ol' mozz over fresh for these pizzas but feel free to go with fresh!)
- 1 cup grape tomatoes (halved)
- 1 small potato (sliced into extremely thin rounds and tossed with olive oil, salt and pepper)
- 1/3 of a Japanese eggplant sliced into extremely thin rounds, tossed with olive oil, salt and pepper (disclaimer: we ran out of eggplant for photo-taking after making our test pizza, but it should be included if you like eggplant!)
- 3 cups spinach leaves roughly chopped
- Large handful of fresh basil (torn)
- Salt
- Freshly ground black pepper
- Extra virgin olive oil
- 2/3 cup ricotta cheese
- 1/4 cup sun-dried tomatoes (roughly chopped)
Instructions
To make the dough:
- In a large bowl, dissolve the sugar in the warm water. Mix in the yeast with a fork, breaking up big clumps, and follow with the olive oil. Give it a quick stir and allow to sit for 15-20 minutes, until it's uber- foamy and puffed up in the bowl!
- When it's good and foamy, start adding your flour one cup at a time, stirring with a wooden spoon or spatula. After the first cup, sprinkle the salt over the mixture evenly. Keep adding flour. After adding the fifth cup, assess your consistency--if it's still quite wet, inch towards 6 cups. If it's dry enough to start kneading, dive in with floured hands. I always leave some flour allowance between what I add during the mixing phase and the total stated because you're going to add flour as you knead.
- Knead the dough for 5-10 minutes, adding flour to make the dough smooth and elastic. It will stick to your hands in the beginning; just scrape it off and add more flour as you go. It's helpful to measure out your remaining amount of flour (so 7 cups minus what you've already added before kneading) so you don't surpass the maximum amount required as you marvel over your lovely dough.
- When the dough is smooth and elastic, and there are no more excess dough bits at the bottom of your bowl, sprinkle some fresh flour in the bottom of the bowl and on top of your dough, cover with a warm damp cloth, and let rise in a warm room or a closed oven for 1 hour, or until doubled in size.
- At this point, you can punch the dough down, or cover the bowl with plastic wrap and put it in the fridge until you’re ready to use it. I like to use it right away because a dough that sits in the fridge too long starts to develop an unpleasant yeasty flavor, though others would probably contradict me.
- When you’re ready to roll out the crust, preheat your oven to 500 degrees. If you're using a stone, make sure that's in the oven. Liberally flour your board prior to rolling out your dough. I can't emphasize this enough, because if you'll be sliding your pizza onto a stone in the oven, it will need to be jiggly enough on your cutting board when weighed down with toppings to slide oh-so-effortlessly onto the stone. Seriously. You've been warned. You should be using a wooden board, will which act as your MacGyver-ed pizza peel, if you're going the pizza stone route. If you're using a sheet pan, just roll the dough out on the pan.
- Okay, now comes the tricky part. Rolling out the dough. Seems simple--just grab your rolling pin and squidge the hell out of it until it's a neat circle, right? WRONG.
- When you start with your gob of dough, you want to roughly shape it with floured hands into a flattish circle. At this point it will be thick--about an inch. Then you want to go in with the fists. We're talkin' pizzeria level technique here--but it's seriously not hard! Just place the dough on your two fists and imagine that your making tiny little vertical fist pumps with your hands rotating slightly. As you do this, the dough will naturally stretch by its own weight. Better yet, the dough will stretch from the center (i.e. where your fists contact the dough), which means that you'll end up with a slightly thicker edge. That's your crust! Now your job is to make sure the dough stretches evenly and that no holes are allowed to punch through your lovely dough. You'll want to do this until the dough is about a quarter inch thick. Unevenness within a range of 1/8"-1/4" is totally fine. In fact, it's your friend. Lay the dough down on your liberally floured board.
- If you're one of those people that is adamant about your pizza being, in fact, a circle, now is when you grab the rolling pin. Use the pin to roll out from the center, never allowing the pin to squish your crust. Rolling the dough out shouldn't be in a traditional Paula-Deen-pie-crust way, but with the pin angled to follow the radius of the dough until you've achieved a circle with a raised crust. So you're not rolling out from the center, you're rolling around to follow the circle of the dough. Again, never letting the pin crush the crust. This means the pin should be angled ever so slightly at about 15-20 degrees to preserve crust height. If you see air bubbles--excellent, use the pin or your hands to gently push them to the edges (THESE WILL BE CRUST BUBBLES!).
- Now. You're ready for toppings.
To make the Veggie Supreme Pizza:
- Grab your sauce. Spread it evenly on your pie. Sprinkle over the sliced onions, followed by half of the mozzarella cheese you want on the pizza. Sprinkle over some grape tomatoes, followed by the potato and eggplant rounds, spinach, and basil. Sprinkle with more mozzarella, season with salt and pepper, and drizzle with olive oil. Bake for 10-14 minutes at 500-550 degrees F.
To make the Spinach and Sun-Dried Tomato White Pizza:
- Spread a thin layer of olive oil over your crust. Spread on a layer of ricotta cheese, and sprinkle with onion and cherry tomatoes. Sprinkle on half the mozzarella you want on the pie, followed by the spinach, basil, and chopped sun-dried tomato. Sprinkle with more cheese, season with salt and pepper, and drizzle with olive oil. Bake for 10-14 min at 500-550 degrees.
Tips & Notes: