As a child stepping up to any Chinese bakery case––be it in Chinatown or, more typically, an Asian grocery store in a non-descript New Jersey strip mall––there was one item that I always overlooked: the ham and cheese bun.
There was something about those ham and cheese buns that never sat well with me. Perhaps it was the vaguely rubbery-looking white cheese, or the dry, pink ham that bore a striking resemblance to that something you might find in a can.
Long story short, I’ve basically NEVER eaten a ham and cheese bun from a Chinese bakery, always going for a much more wholesome coconut bun, pineapple bun, or red bean bun instead.
Well folks, today, all that changes. Because now that we have our trusty milk bread recipe (I know there are probably a bunch of regular TWOL readers out there who just want us to get OVER the unhealthy obsession we have with that recipe, but…we’re clearly not over it. We know it’s a problem, and you’ll just have to bear with us.), I’m taking that lowly government cheese/canned ham version of this Chinese bakery staple and upping the quality level a bit.
Trust me, get your favorite sliced ham from the deli case and whatever good melting cheese you can get your hands on, and make these buns. You won’t regret it. I made twelve of these bad boys last weekend, and they were gone within 24 hours (thanks to various neighborhood taste testers, who all gave their hearty stamp of approval).
The best part is? Ham and cheese buns totally qualify as a 24-hour kind of food. Like the humble pizza bagel, you can eat these in the morning, you can eat them in the evening. You can eat them at supper time. When ham & cheese is in a milk bread bun, you can eat them anytime.
Did I pull off that reference? I’m not sure I did. It’s fine; you guys get me.
Ham and Cheese Buns: Recipe Instructions
In the bowl of a stand mixer, add the heavy cream, milk, egg, sugar, cake flour, bread flour, yeast, and salt.

Don’t Have Cake Flour or Bread Flour?
Feel free to substitute all-purpose flour for both! We have since extensively re-tested this recipe, and have not found that using 100% all-purpose flour in this recipe makes a meaningful difference to the result.
Use the dough hook attachment, and turn on the mixer to “stir.” Let it go for 15 minutes, occasionally stopping the mixer to push the dough together. If you’re in a humid climate and the dough is too sticky, feel free to add a little more flour 1/4 cup at a time until it comes together. If you don’t have a mixer and would like to knead by hand, extend the kneading time by 5-10 minutes.
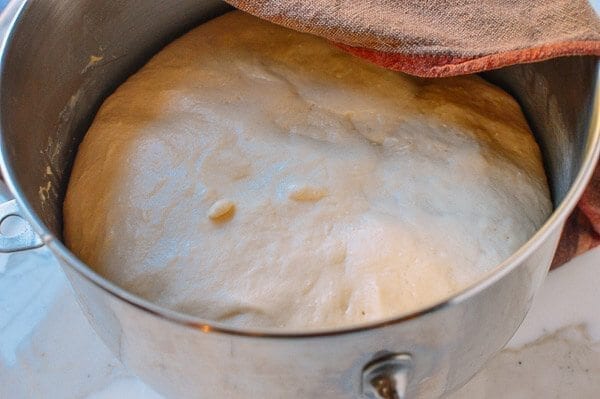
After 15 minutes of mixing, the dough is ready for proofing. Cover the bowl with a damp towel and place in a warm spot for 1 hour. I proofed the dough in my oven (I had the oven on rapid proof for 5 minutes, turned the oven off, and then closed the oven door). The dough will grow to 1.5X its original size.
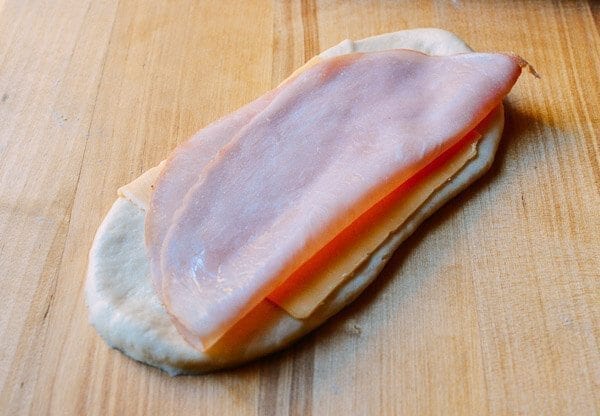
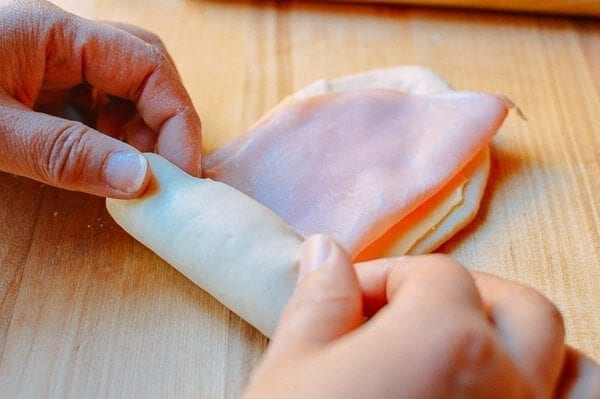
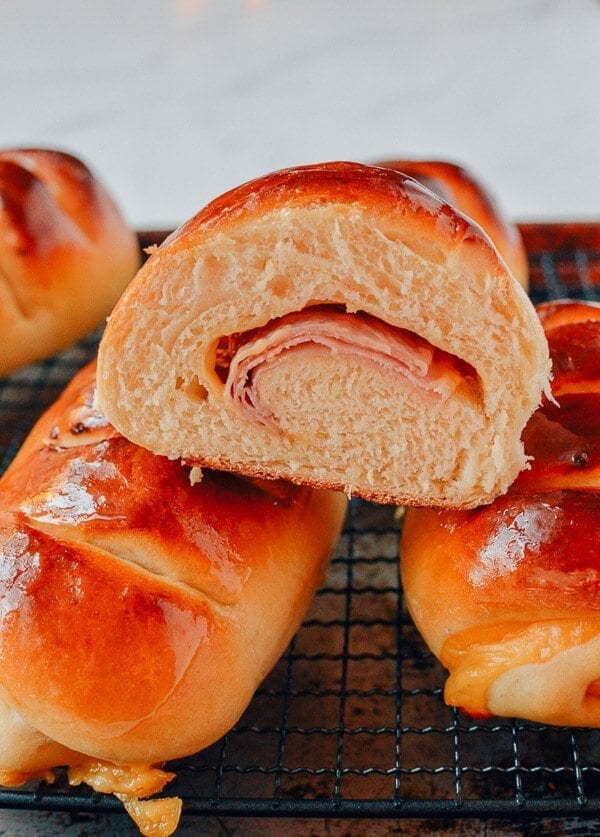
After the hour of proofing, put the dough back in the mixer and stir for another 5 minutes to get rid of air bubbles. Dump the dough onto a lightly floured surface, and cut it into 12 equal pieces. Roll out each piece into a rough oval/rectangle shape, and lay the ham and cheese on top.
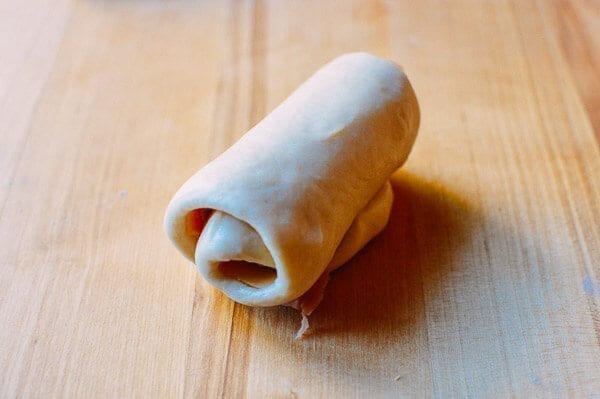
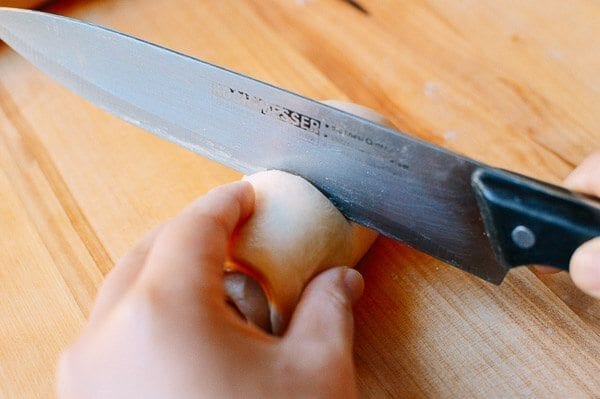
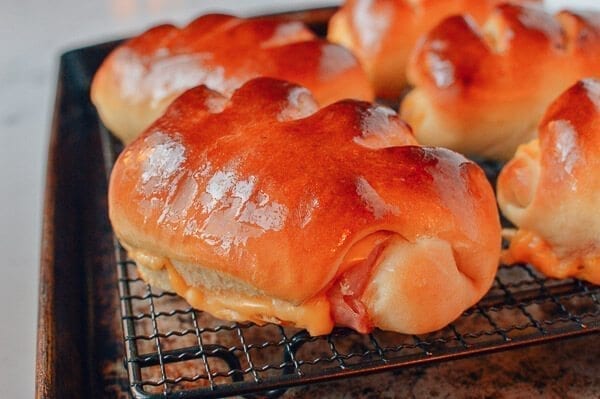
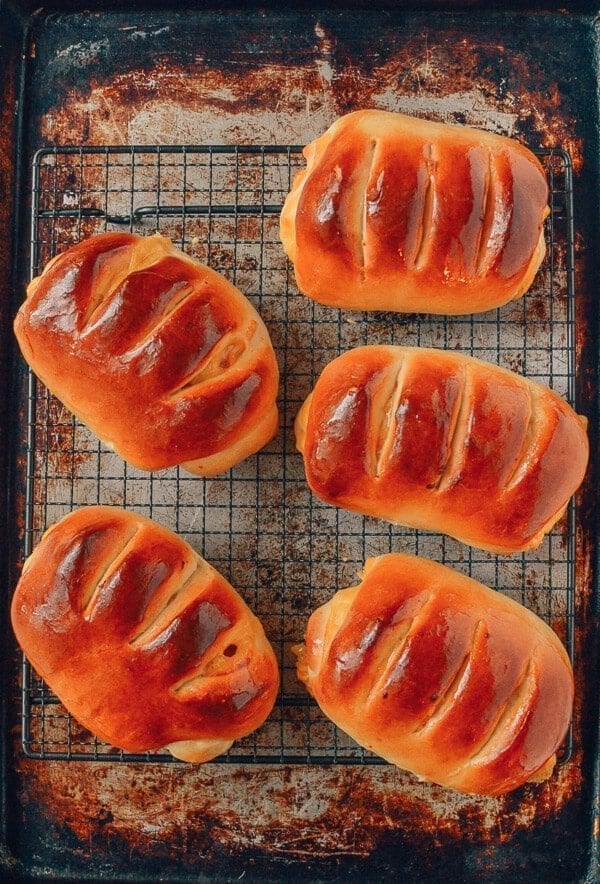
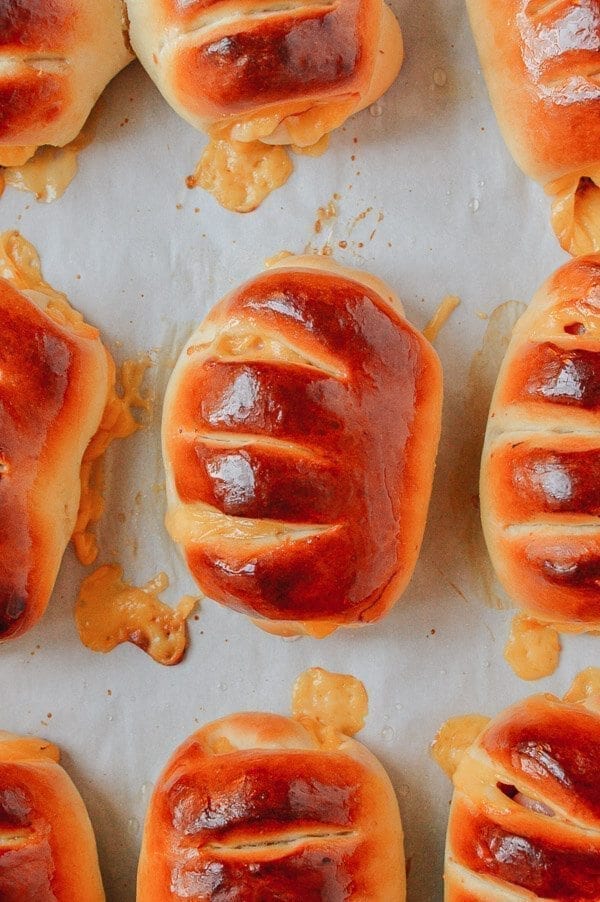
Roll everything together into a log, and cut three slits into the top of each bun (about 1/2 inch deep).
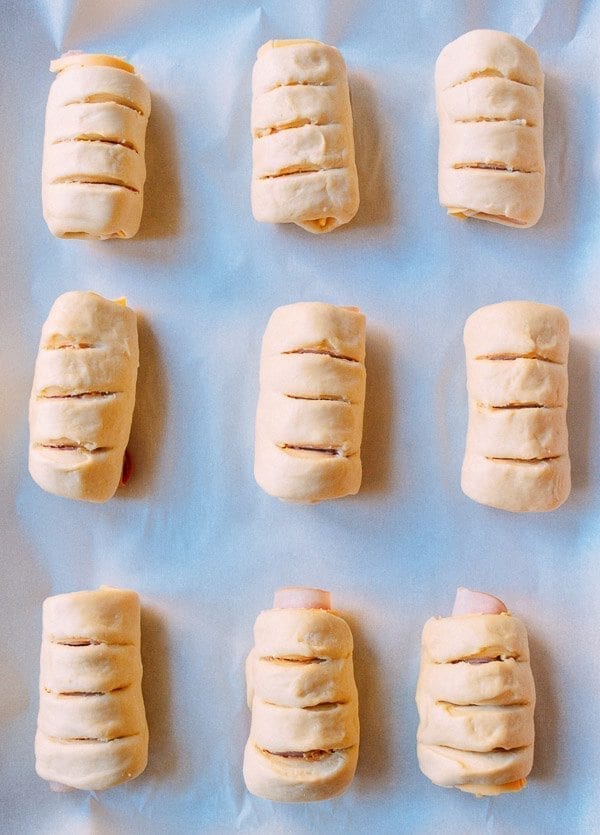
Continue assembling until all the buns are made. Cover with a clean, damp towel and allow to rise on a half sheet pan for another hour.
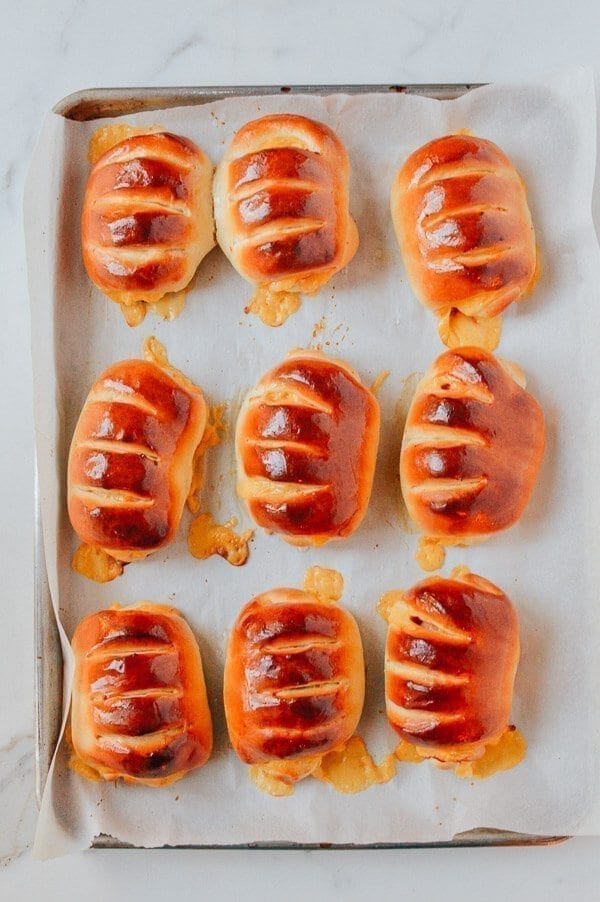
Preheat the oven to 350 degrees F. Brush the risen ham and cheese buns with egg wash and bake for 20-24 minutes until golden.
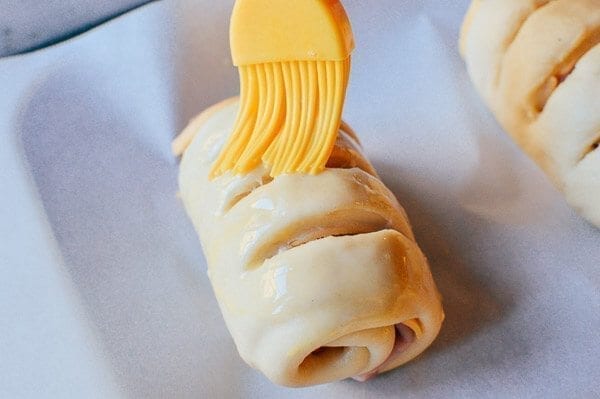
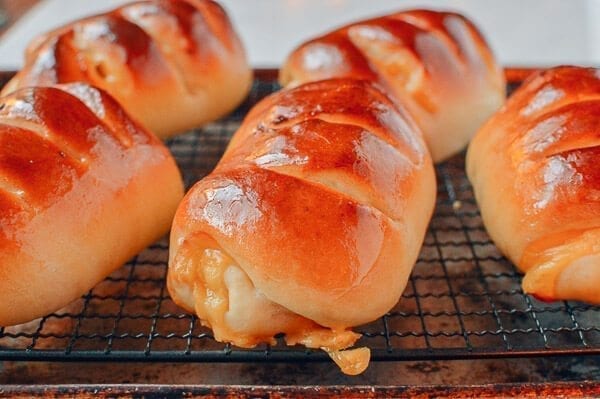
Remove from the oven, place on a cooling rack and brush the buns with sugar water to give them a really great shine, sweetness, and color.
These Chinese bakery ham and cheese buns freeze and reheat very nicely in the microwave or the toaster oven. Make a batch today and freeze them for morning breakfast treats!
Looking for more authentic recipes? Subscribe to our email list and be sure to follow us on Pinterest, Facebook, Instagram, and Youtube!
Recipe

Ham and Cheese Buns, A Chinese Bakery Treat
Ingredients
- 2/3 cup heavy cream (160 ml, at room temperature)
- 1 cup milk (plus 1 tablespoon, at room temperature; total 250 ml)
- 1 large egg (at room temperature)
- 1/3 cup sugar (75g)
- 1/2 cup cake flour (70g)
- 3 1/2 cups bread flour (500g)
- 1 tablespoon active dry yeast (11g)
- 1 1/2 teaspoons salt (7g)
- 12 slices ham
- 12 slices cheese
- (Egg wash: whisk together 1 egg with 1 teaspoon water)
- 2 teaspoons sugar (8g, dissolved in 2 teaspoons hot water to make simple syrup)
Instructions
- In the bowl of a mixer, add the heavy cream, milk, egg, sugar, cake flour, bread flour, yeast, and salt. Use the dough hook attachment, and turn on the mixer to “stir.” Let it go for 15 minutes, occasionally stopping the mixer to push the dough together. If you’re in a humid climate and the dough is too sticky, feel free to add a little more flour 1/4 cup at a time until it comes together. If you don’t have a mixer and would like to knead by hand, extend the kneading time by 5-10 minutes.
- After 15 minutes of mixing, the dough is ready for proofing. Cover the bowl with a damp towel and place in a warm spot for 1 hour. I proofed the dough in my oven (I had the oven on rapid proof for 5 minutes, turned the oven off, and then closed the oven door). The dough will grow to 1.5X its original size.
- After the hour of proofing, put the dough back in the mixer and stir for another 5 minutes to get rid of air bubbles. Dump the dough onto a lightly floured surface, and cut it into 12 equal pieces. Roll out each piece into a rough oval/rectangle shape, and lay the ham and cheese on top. Roll everything together into a log, and cut three slits into the top of each bun (about 1/2 inch deep). Continue assembling until all the buns are made. Cover with a clean, damp towel and allow to rise for another hour.
- Preheat the oven to 350 degrees F. Brush the risen buns with egg wash and bake for 20-24 minutes until golden. Remove from the oven and brush the buns with sugar water to give them a really great shine, sweetness, and color.